

Welcome to Astrospheric's Photo of the Month
Each month a member submitted photo will be showcased for the entire community to enjoy and learn from.
To learn more about the community and how to participate, please follow this link.
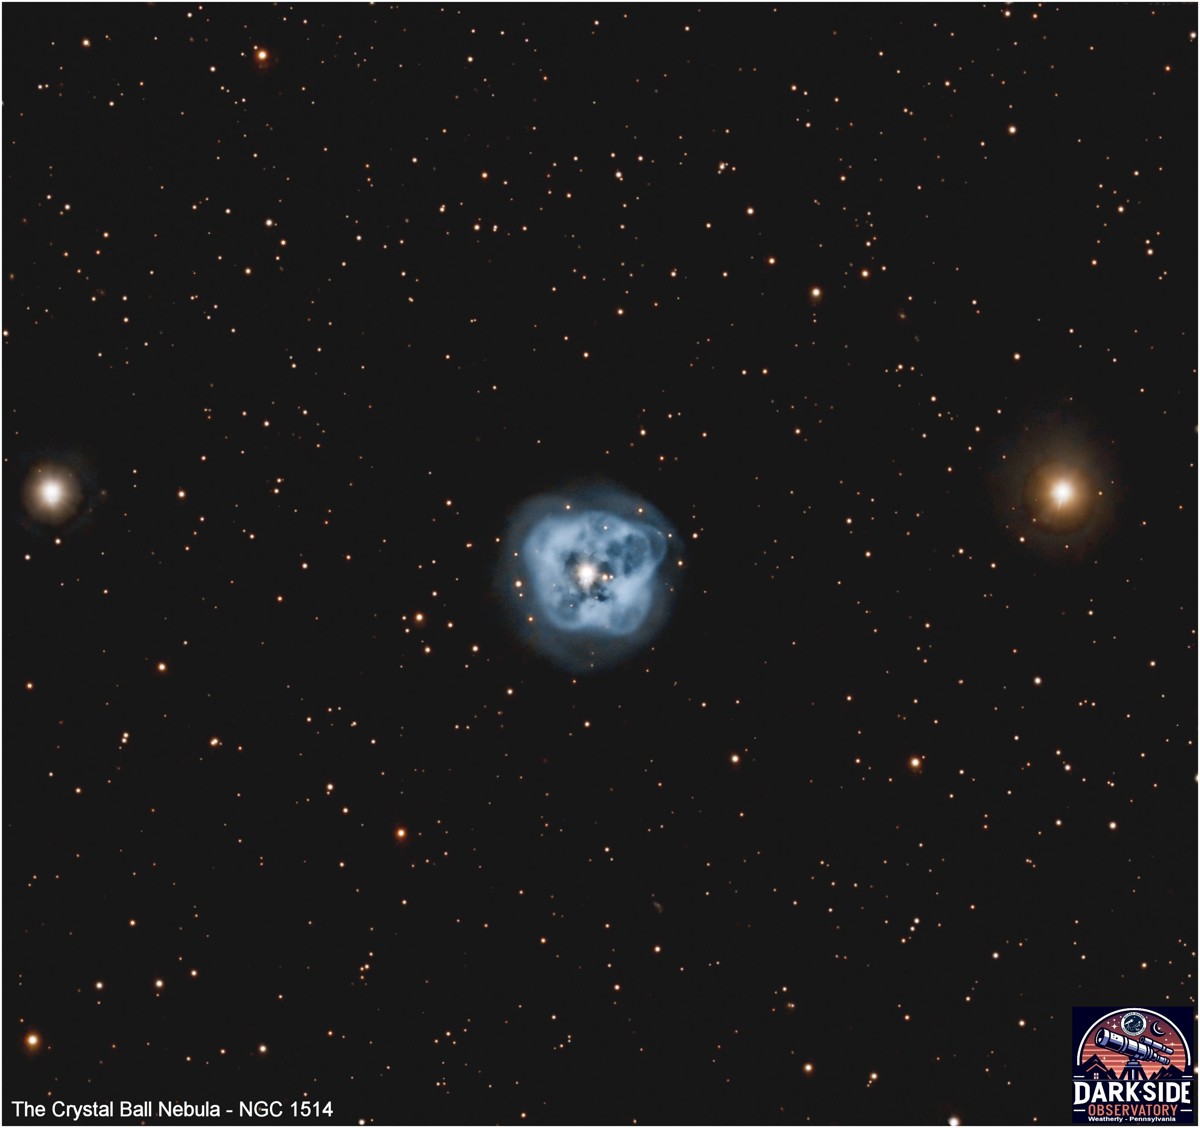
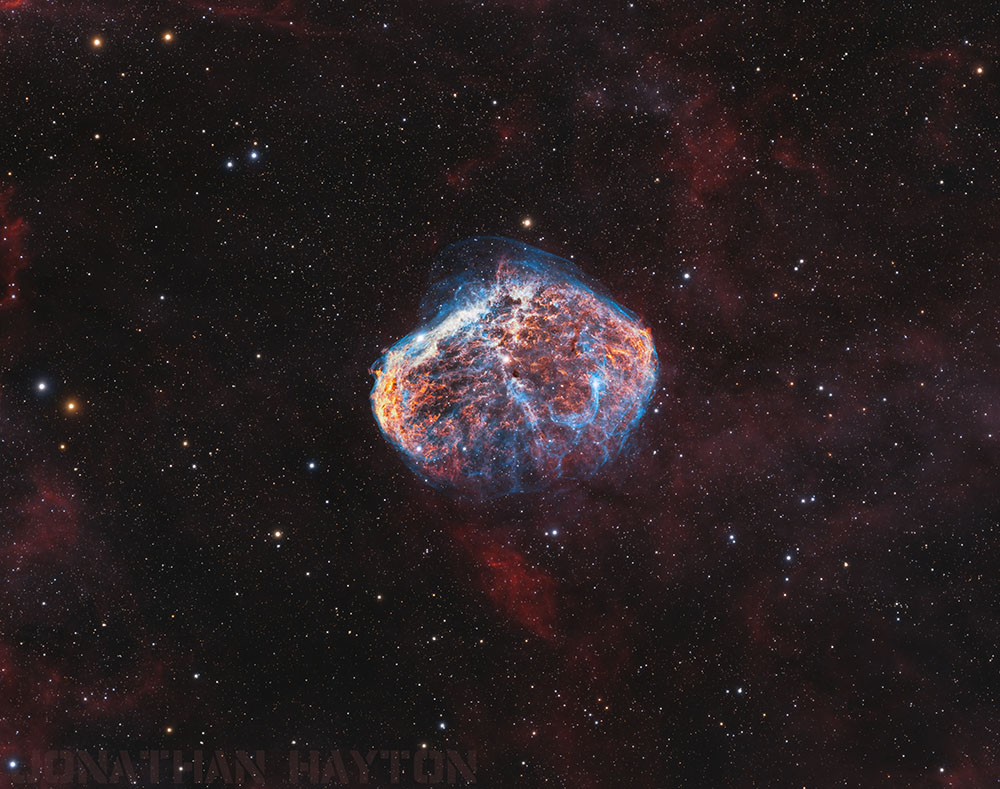
Captured from The Dark Side Observatory (W59) in Weatherly, Pennsylvania, this image showcases the beautiful Crystal Ball Nebula (NGC 1514) under Bortle Class 4 skies in the Pocono Mountains. Located in the constellation Taurus approximately 1,500 light-years from Earth, NGC 1514 is a planetary nebula formed from the glowing shell of gas expelled by a dying star similar in mass to our Sun.
At the heart of the nebula lies an unusual binary star system. The interaction of these two stars is believed to significantly influence the nebula's structure. Unlike many planetary nebulae with sharply defined edges, the Crystal Ball Nebula appears smooth and diffuse, giving it a subtle and ethereal quality while offering astronomers valuable insight into how binary systems shape the final stages of stellar evolution.
- Location: The Dark Side Observatory (W59), Weatherly, Pennsylvania
- Sky Quality: Bortle Class 4
- Telescope: Meade LX-90 12" SCT on a Celestron CGX-L (pier mounted)
- Camera: ZWO ASI2600MC Pro at -10°F (no filter)
- Exposure: 145 x 60-second exposures with guiding
- Software: ASIAir, DeepSkyStacker, PixInsight, Corel PaintShop Pro

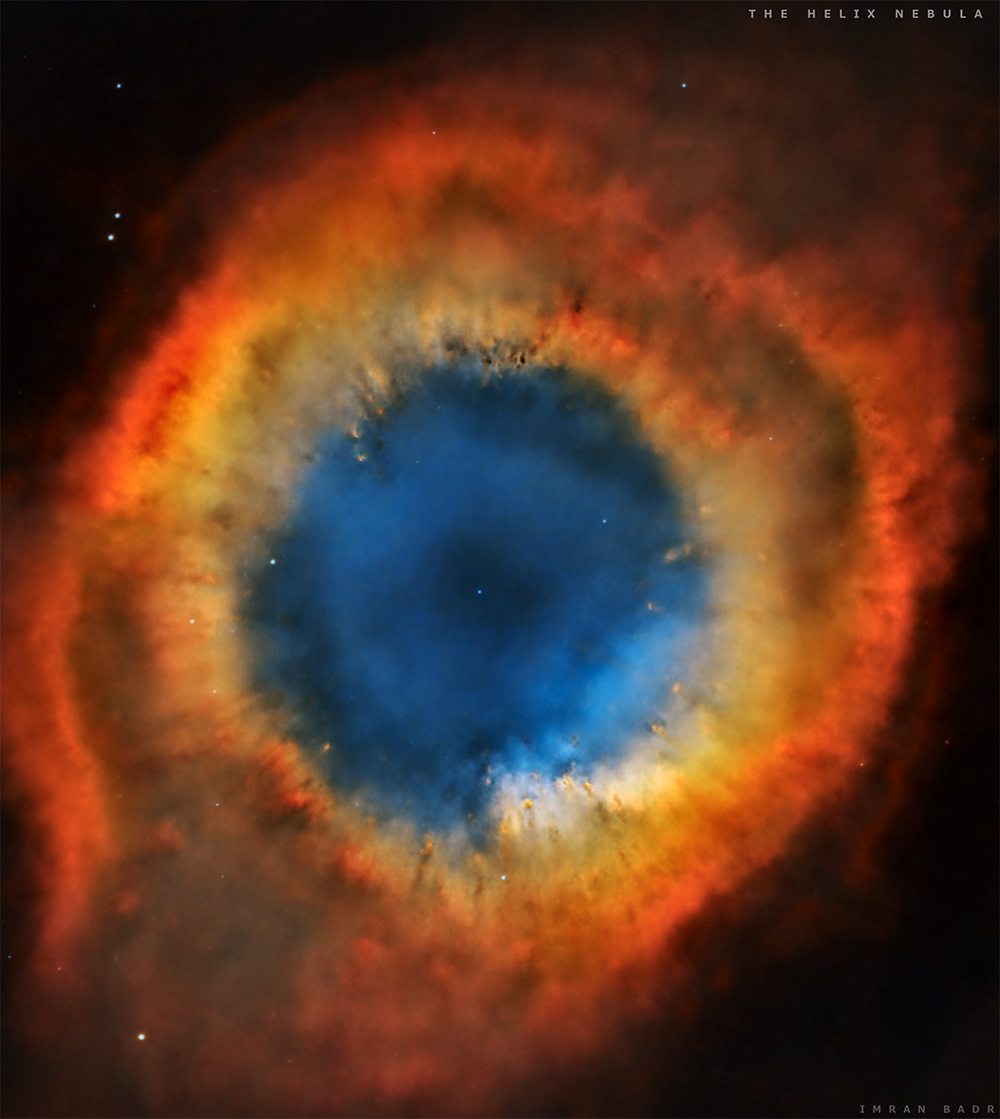
Captured from a Bortle 7+ backyard in Menifee, Southern California, this image features NGC 7293, better known as the Helix Nebula or the "Eye of God". Located in the constellation Aquarius near the bright star Fomalhaut, the Helix reaches only about 35 degrees altitude from this location, making it a challenging southern target. At a distance of roughly 700 light-years, its large apparent size and brightness help offset the low elevation.
The nebula’s central white dwarf is clearly visible as it sheds expanding shells of hydrogen and oxygen. Particular attention was given in processing to the inner "iris" region, where much of the Helix’s character and depth emerge.
- Telescope: 13.1" Coulter Dobsonian reflector, refigured and converted to a trackable OTA on an EQ6-R
- Camera & Filters: ZWO ASI2400MC Pro at -10 C with Optolong L-Extreme
- Exposure: ~5 hours total using 5-minute subs, guided at 0.6"–0.7" RMS (image scale 0.89"/px)
- Software: NINA (capture), PixInsight and Photoshop (processing)

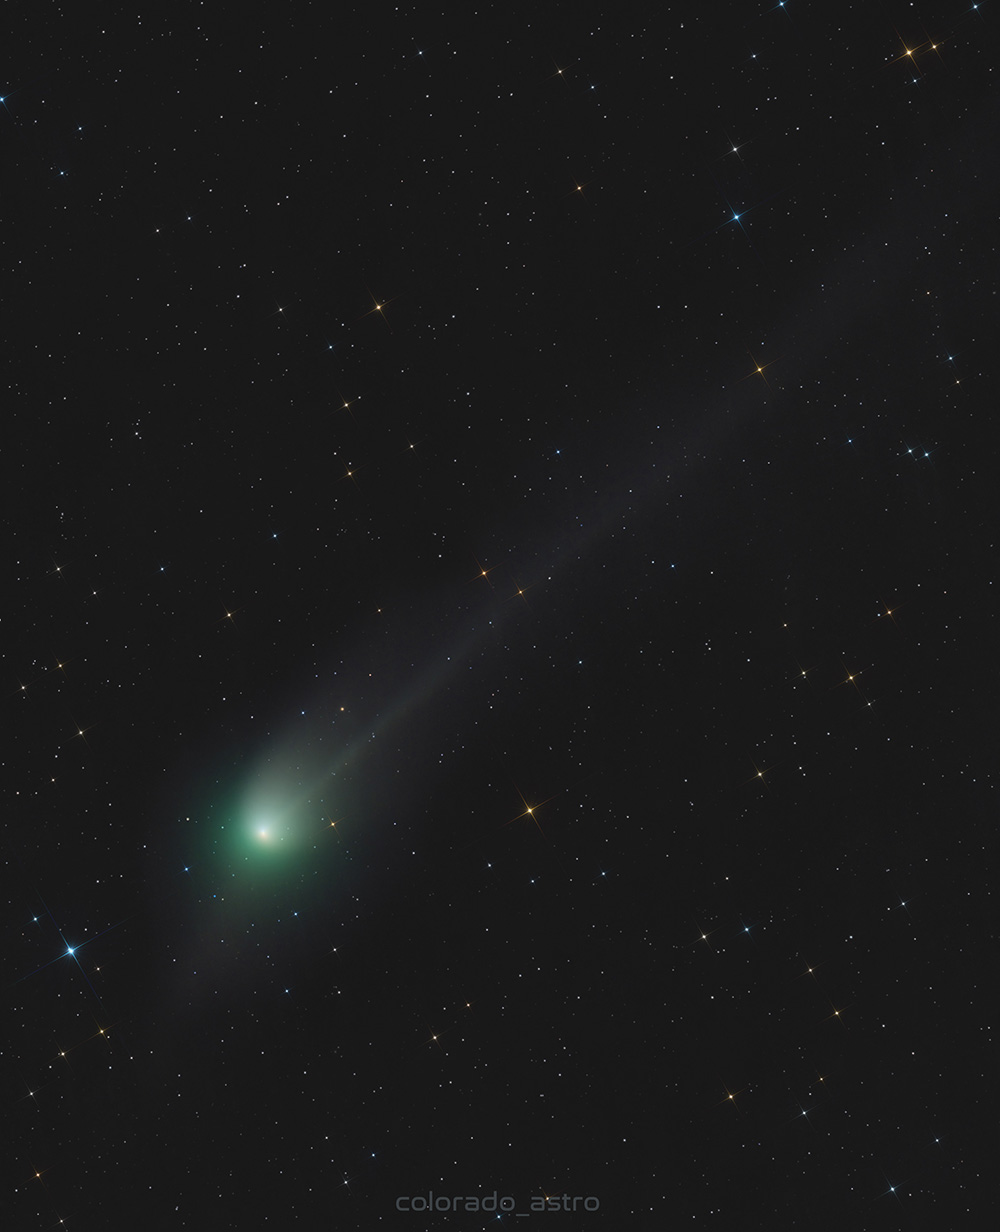
Captured the morning of September 27, 2025 from a Bortle 5 backyard in Northern Nevada while the comet was around magnitude ~9. Stacked and processed in PixInsight.
- Telescope: William Optics Z81 doublet, reduced to ~450 mm f/5.5
- Camera & Filters: IMX571MM with ZWO LRGB
- Exposure: 21 x 180s L; 14 x 120s each for R, G, B
- Software: PixInsight (stacking & processing)

Captured from North West Georgia, Mitchell Duke brings us this beautiful view of Saturn and its moon Tethys.

Captured from a Bortle 7 backyard in Aliquippa, Pennsylvania, this image of the Eagle Nebula (M16) showcases the famous “Pillars of Creation”—vast towers of gas and dust where gravity collapses matter into newborn stars. Located roughly 6,500-7,000 light-years away in the constellation Serpens, the data was acquired over two nights in early July 2025 and processed entirely in PixInsight.
- Target: Eagle Nebula (M16), Serpens — distance ~6,500-7,000 ly
- Location: Aliquippa, Pennsylvania (Western PA) • Bortle 7
- Total Integration: 4 hours over 2 nights
- Subexposures: 300s each
- Filters: Baader 6.5nm SHO set (SII, Hα, OIII)
- Telescope: Askar 103APO
- Camera: ZWO ASI585MM Pro
- Guiding: Askar OAG + ZWO ASI220MM
- Mount: Sky-Watcher EQ6-R Pro
- Control: ZWO ASIAIR
- Stacking & Processing: PixInsight only

The Pinwheel Galaxy, also known as Messier 101 (M101), is a stunning face-on spiral galaxy located in the constellation Ursa Major. It lies about 21 million light-years from Earth and spans roughly 170,000 light-years across—nearly twice the size of the Milky Way. Its grand design spiral arms are rich with star-forming regions, glowing with ionized hydrogen. The galaxy's symmetry and detail make it a favorite target for both amateur and professional astronomers.
- Location: Backyard in San Jose, California
- Integration Time: 87 hours
- Telescope: Skywatcher Esprit 100ED
- Camera: ZWO ASI2600MM Pro
- Filters: Antlia 2.5nm Ha, Optolong LRGB
- Mount: ZWO AM5
- Exposure Details: View on Astrobin

I took this image from my backyard in Nashville, TN (Bortle 8-9), about 3 miles from downtown, over the course of the last three winters. It represents a total of 569 hours of exposure collected across 147 nights. I was especially lucky that Mars entered the frame in 2023 — you can spot it in the bottom left of the image.
Total integration time: 569h 4m 30s
Integration per filter:
- R: 25m
- G: 25m
- B: 25m
- Ha: 178h 18m
- SII: 175h 53m
- OIII: 213h 38m 30s
Equipment I used:
- Telescope: Askar FMA180
- Camera: ZWO ASI2600MM Pro
- Mount: ZWO AM5
- Filters:
- Antlia 3nm Narrowband H-alpha 2"
- Antlia 3nm Narrowband Sulfur II 2"
- Astronomik Deep-Sky Blue 2"
- Astronomik Deep-Sky Green 2"
- Astronomik Deep-Sky Red 2"
- Chroma OIII 3nm Bandpass 2"
- Accessories: ZWO ASIAIR Plus, ZWO EAF, ZWO EFW 7 x 2″
- Software: Adobe Photoshop, PixInsight, ZWO ASIAIR

Bode's Galaxy, also known as Messier 81 (M81), is a grand-design spiral galaxy located about 12 million light-years away in the constellation Ursa Major. It features well-defined spiral arms filled with young, hot stars and glowing regions of star formation. M81 is one of the brightest galaxies in the night sky and is easily visible through small telescopes. I captured it via Celestron 9.25EdgeHD and ZWO ASI2600mm pro, Antlia L, R, G, B and Ha 2.5nm over Sky-Watcher EQ6RPro. 29 hours of 120s (LRGB) and 300s (Ha) exposures. Shot from bortle 7 backyard and processed in Pixinsight.
AstroBin Profile
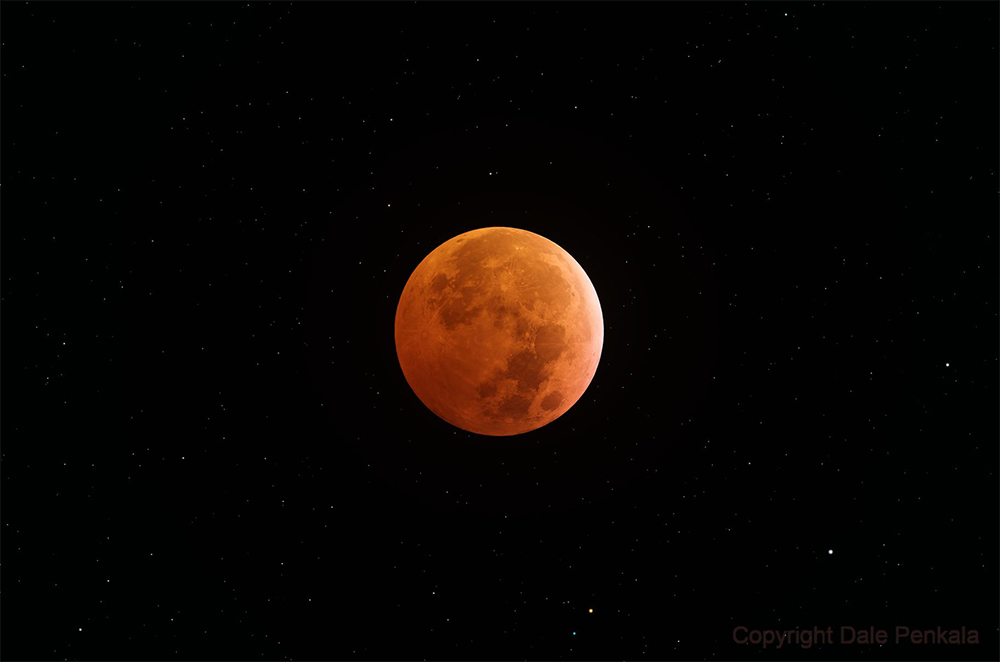
I was really surprised that it cleared up here in Michigan by the deepest point of the eclipse. When I opened up my observatory I had high thin clouds lingering but I decided to give it a go anyway. I imaged the eclipse pretty much from 1st contact through to almost last contact but used a couple different methods. For this image I used 1.25 second subs for the moon and for the star layer I used 3 second subs. I then stacked them in APP (Astro Pixel Processor), registered both images, and post processed both images in PixInsight. Once I had both the starless version and the star layer processed I then combined them using Pixel Math and then a little tweak in GIMP. I've always enjoyed lunar images with stars in the background. It just gives it a 3D effect in my personal opinion.
I hope you like it!
- Location: Penmitlaw Observatory in Auburn, Michigan, USA
- Time Stamp Of Image: 03/14/2025 - 2:58am
- Telescope: Esprit 100
- Mount: AP1200GTO
- Camera: ZWO 2600MC Pro
- Filters: UV/IR - Cut
- Software:
- Astro Pixel Processor (APP)
- Pleiades Astrophoto PixInsight
- SharpCap
- Cartes du Ciel (CDC)
- GIMP
- Exposure:
- Moon: 1.25 second subs
- Stars: 3 second subs

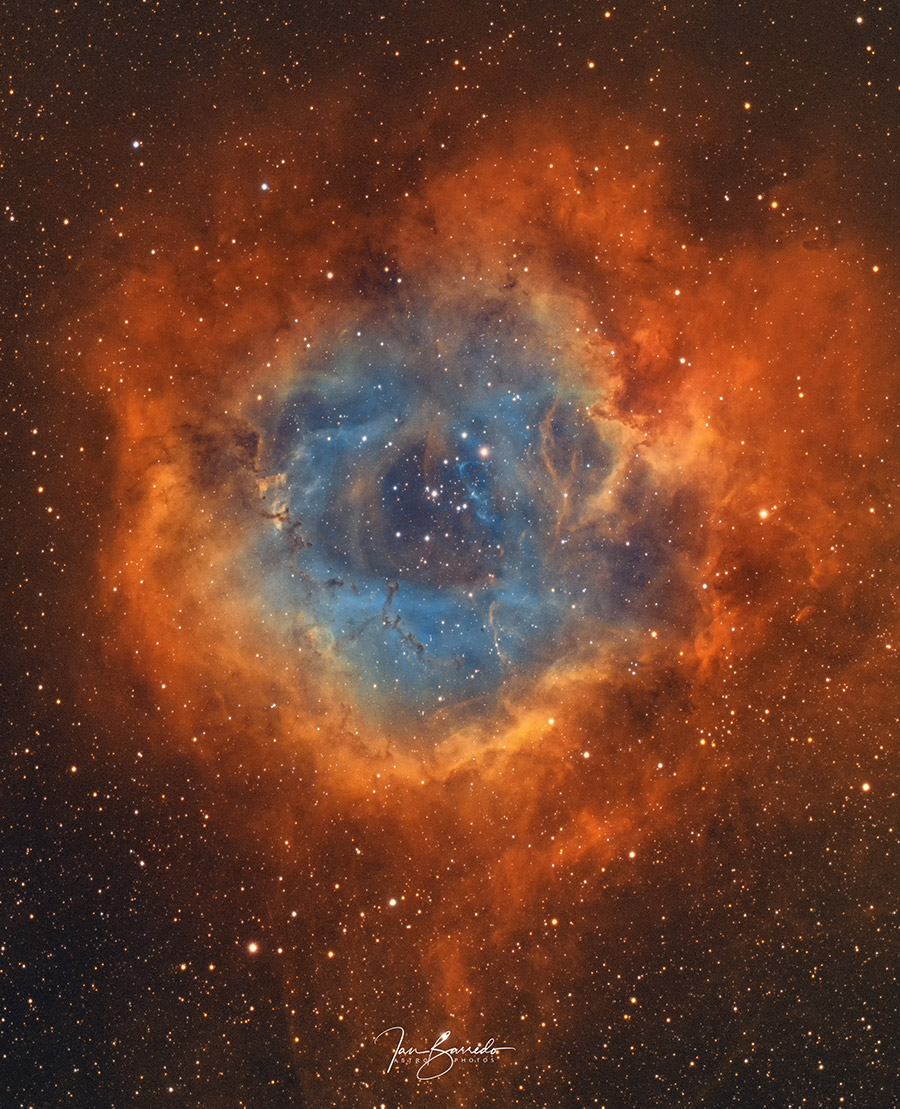
The Rosette Nebula (NGC 2237/8) is a well-known and popular emission nebula in Monoceros, located about 5,200 light-years away, with its central cluster NGC 2244 exciting the surrounding gas to create its iconic glowing structure. This image looks deeper into the Rosette nebula and shows structures with clarity and detail. This is a crop of a little wider field of view. For this image, I combined data from Nov 2022 from a one-shot color camera with dual-narrowband filter and latest data from Jan 2025 using a mono camera with 3nm S,H and O filters.
- Telescope: Sky-Watcher Esprit 100ED
- Camera: ZWO ASI2600MM Pro, ZWO ASI2600MC Pro
- Mount: ZWO AM5
- Filters:
- Antlia 3nm Narrowband H-alpha 2"
- Antlia 3nm Narrowband Oxygen III 2"
- Antlia 3nm Narrowband Sulfur II 2"
- Optolong L-Ultimate 2"
- Software:
- Adobe Photoshop
- Pleiades Astrophoto PixInsight
- Dates:
- Nov 2024
- Jan 2025
- Frames:
- Antlia 3nm Narrowband H-alpha 2": 32x600″ (5h 20')
- Antlia 3nm Narrowband Oxygen III 2": 21x600″ (3h 30')
- Antlia 3nm Narrowband Sulfur II 2": 15x600″ (2h 30')
- Optolong L-Ultimate: 96x300″ (8h)
- Integration: 19h 20

Supernova remnant the Spaghetti Nebula (SH 2-242) in HOO
Equipment and Location:
- Telescope - Askar V 60mm w/ Reducer (270mm Focal Length)
- Camera - ZWO ASI2600MC Air
- Mount - ZWO AM5n
- Filters - Askar ColorMagic D1 (Ha+Oiii) and D2 (Sii+Oiii)
- Images acquired January 3 - 9 from my backyard in Central Florida (Bortle 5)
Acquisition and Workflow:
- D1: 240x300secs
- D2: 240x300secs
- UVIR RGB Stars: 60x60secs
40 hours total integration from a single panel, stacked in Astro Pixel Processor and processed in PixInsight:
- Dynamic Crop
- Auto DBE
- SPCC
- DBExtract
- BlurX, StarX, NoiseX
- Stretched with GHS
- LRGB Combination (HOO Palette)
- Narrowband Normalization
- Color Mask Mod
- Star recombination with RGB star data
Final adjustments made in Photoshop.

I was looking for a target last month to fit Askar 300 Pro's focal length and 2600mm's sensor size. It is a tight fit but worked out. About 3000 light-years away, this beautiful question mark NGC7822 lies at the edge of the constellation Cepheus.
- Location: San Jose, CA
- Telescope: Askar FRA300 Pro
- Camera: ZWO ASI2600mm Pro
- Mount: ZWO AM3
- Dates: Nov 16 - Dec 06, 2024
- Antlia H-alpha Ultra Narrow Band 2.5nm 2": 80x600" (13h 20')
- Antlia OIII Ultra Narrow Band 2.5nm 2": 99x600" (16h 30')
- Antlia SII Ultra Narrow Band 2.5nm 2": 104x600" (17h 20')
- Antlia V-Pro Blue 2": 15x300" (1h 15')
- Antlia V-Pro Green 2": 15x300" (1h 15')
- Antlia V-Pro Red 2": 15x300" (1h 15')
- Integration: 50h 55'

The SDSO1 discovery changed the way I looked at the Andromeda galaxy. I started Astrophotography in fall of 2022. Earlier this year, I decided to capture that arc by myself upon my two-year anniversary in this hobby by fall of 2024. I started capturing data in late summer of 2024. Nights were short and warm, but I continued to capture Ha and O3 on every clear night from my backyard in San Jose, CA. It was very challenging to capture that faint O3 arc. Ha was relatively easier. After around 40 hours of O3 integration, I started seeing some faint O3 nebulosity. I continued to capture data until the first week of Nov 2024 for a total integration on 223+ hours. I did processing in Pixinsight and Photoshop.

The weekend weather pattern of October 13th, 2024 was perfect and gave me the opportunity to try and capture the comet C/2023 A3. I made a last-minute decision to travel to the top of a mountain in northern Nevada, Peavine Peak. At 8,200 feet above sea level, this location offered better visibility of a comet already very low on the horizon. The decision paid off, presenting striking views of local vistas. As dusk arrived, three generations of my family were blessed with the naked-eye visibility of comet C/2023 A3. I was joined by my father and son, making it a truly once-in-a-lifetime experience.
I had a narrow window to photograph the comet, balancing sky brightness and exposure time. Too much exposure would wash out the image, while too little would fail to capture meaningful details. I began with 10-second exposures and moved to 30-second exposures as the sky darkened.
After all was said and done, I had just over 24 minutes of total exposure time. I knew I had captured something special. I stayed up for hours that night processing my digital image files until I achieved my final result:
C/2023 A3 (Tsuchinshan-ATLAS)
Captured from the 8,200 ft peak of Peavine Peak in Reno, Nevada, on 10/13/2024.
- Mount: ZWO AM5n
- Telescope: Sharpstar 61 EDPH II Reduced x0.8 ~270mm f/4.4
- Camera: ZWO ASI 2600MC-Pro
- Guide Scope: ZWO 30F4 with ASI120mm Mini
- Control: ZWO ASIAir Plus
- Exposure Details:
- 33 x 10s
- 38 x 30s
- Total Exposure: 24m 30s
- Processing: Stacked and processed in PixInsight

Popularly called the Tulip Nebula, the glowing cloud of interstellar gas and dust in Cygnus is catalogued as Sh2-101. It is about 8,000 light-years away and 70 light-years across. I started imaging this target towards the end of my M20 data acquisition marathon. I wanted to capture details of its core and the bow shock at 2350mm focal-length, so I opted for a 2-panel mosaic. With Bortle 7 skies, I needed a large integration across both panels at F/10 speed. In the end, I had to crop almost 50% of the top panel because signals were weak there and not contributing to the overall image. Maybe next year, I will collect more data for the top panel and also add more panels toward the right to complete the bow shock.
It was a very long project. I hope you will like it.
- Telescope: Celestron C9.25 EdgeHD
- Camera: ZWO ASI2600MM Pro
- Mount: Sky-Watcher EQ6R-Pro
- Filters:
- Antlia Ultra Narrowband 2.5nm S, H, O
- Antlia V-pro R, G, B
- Total Acquisition: 136 hrs

This image of The Cygnus Loop was captured under Bortle 4 skies in Elizabeth, CO, USA, between 7/28/24 and 8/4/24. The total integration time is 15 hours, combining both Ha and Oiii filters. The image was acquired using NINA and processed in PixInsight.
- Camera: ZWO ASI2600MM-Pro
- Filters:
- Antlia 36mm 3nm Ha
- Antlia 36mm 3nm Oiii
- Telescope: Askar FMA180 with ZWO EAF
- Mount: Skywatcher EQ6R-Pro
- Image Details:
- Ha: 120 x 300s, gain 100, -10°C, bin1
- Oiii: 60 x 300s, gain 100, -10°C, bin1
- Total Integration: 15 hrs
- Location: Elizabeth, CO, USA (Bortle 4 sky)
- Acquisition: Acquired in NINA
- Processing: Processed in PixInsight
- Affiliations: Denver Astronomical Society, ASIG Co-Lead

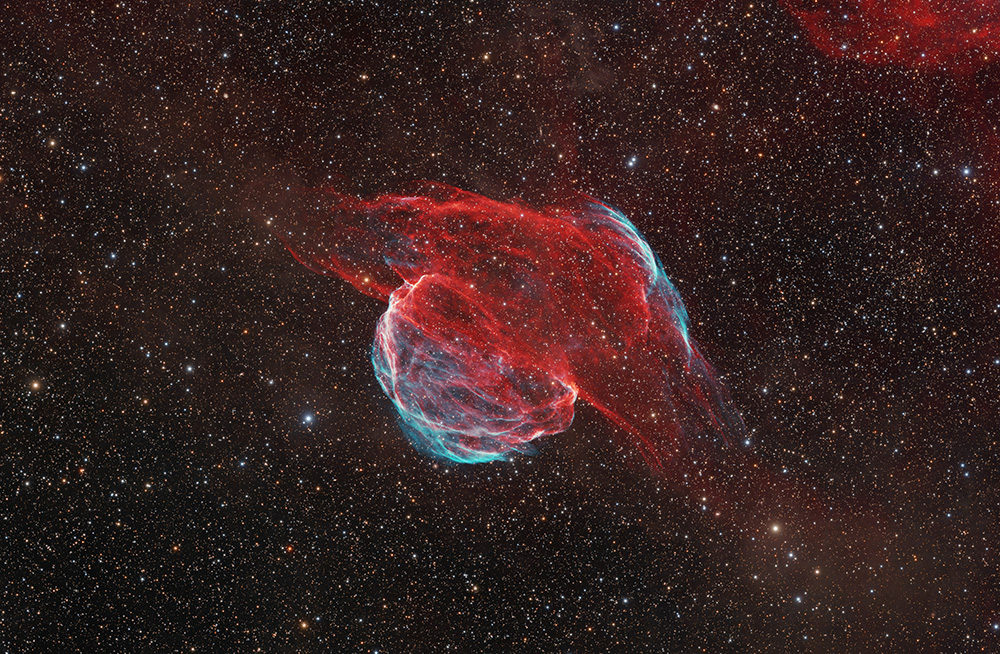
I finally set up a system I felt capable of capturing this very elusive object: SH 2-129 / LBN 445, LBN 449, or as it is commonly known, the Flying Bat and Squid Nebula. Approximately 2,300 light-years away, it resides in the constellation Cepheus.
This was imaged with my Esprit 100 and ZWO 2600MC Pro camera using an NBZ dual-band filter for narrowband data collection. To achieve accurate star colors, I also used a UV/IR Cut filter. I collected just under 21 hours of data, though more integration time would have made processing the OIII channel easier.
All my data was processed in Astro Pixel Processor (APP), where I extracted both the Ha and OIII channels. These were combined in PixInsight (PI) to create an HOO version of the image. The star layer was color-calibrated using SPCC in PI, with all post-processing done in PI.
- Telescope: Esprit 100 / 60mm guide
- Mount: AP1200GTO
- Cameras: ZWO 2600MC Pro / 120mini guide
- Filters: NBZ & UV/IR Cut
- Total Integration: 20 hrs 53 mins
- Software: APP, PI, SharpCap, PHD2, MaxPoint, CDC

The Trifid nebula (M20) in constellation Sagittarius is one of the most imaged objects by Astrophotographers. Discovered by Charles Messier on June 5, 1764, M20 is a unique combination of open cluster of stars, an emission nebula, reflection nebula and dark nebula. At an approximate distance of around 5000ly, this celestial work of art lies within a rich and crowded starfield area. This image is HaO3LRGB. With so many amazing M20 images and more being posted every day, I focused on making this image with more depth and wider range of colors. Thanks to Mike Selby, who captured data which I processed in PixInsight.
- Location: Observatorio El Sauce, Chile
- Telescope: Officina Stellare RiDK 400
- Camera: FLI PL16803
- Mount: 10Micron GM4000 HPS
- Filters:
- Astrodon Gen2 E-Series Tru-Balance Blue 50 mm
- Astrodon Gen2 E-Series Tru-Balance Green 50 mm
- Astrodon Gen2 E-Series Tru-Balance Lum 50 mm
- Astrodon Gen2 E-Series Tru-Balance Red 50 mm
- Astrodon H-alpha 5nm 50 mm
- Astrodon OIII 6nm 50 mm
- Frames:
- Astrodon Gen2 E-Series Tru-Balance Blue 50 mm: 24x900" (6h)
- Astrodon Gen2 E-Series Tru-Balance Green 50 mm: 24x900" (6h)
- Astrodon Gen2 E-Series Tru-Balance Lum 50 mm: 50x900" (12h 30')
- Astrodon Gen2 E-Series Tru-Balance Red 50 mm: 24x900" (6h)
- Astrodon H-alpha 5nm 50 mm: 44x900" (11h)
- Astrodon OIII 6nm 50 mm: 44x900" (11h)
- Integration: 52h 30'

Captured from my backyard in B4 Nevada. I was experimenting with injecting OSC Ha signal into an OSC broadband image.
- 🔭 TsOptics 10" f/5 Newtonian
- 🔎 Starizona Nexus x0.75 Reducer
- 🔍 950mm f/3.75
- 📷 ASI2600MC-Pro
- 🔴/🔵 Antlia ALP-T Ha/Oiii
- 🟣/⚪ SVbony UV/IR Cut
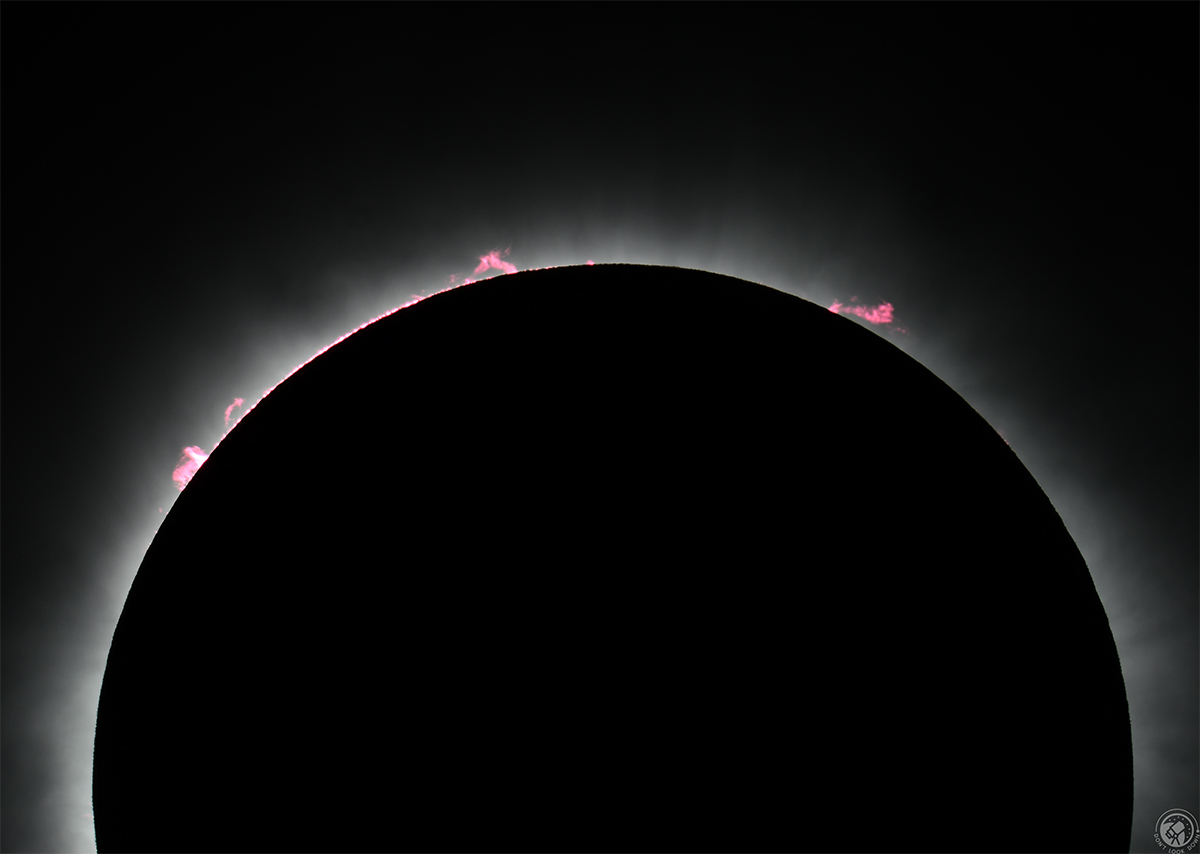
What a journey capturing this photo was. The 18 hour drive from Phoenix to Plano through snowstorms and high winds kicked off my eclipse weekend. After a long week of checking cloud forecasts for what felt like every 10 minutes, I ultimately decided to take the chance staying in Texas Sunday evening. With about 2 hours until C1, there wasn't a single ray of Sun shining over Plano, so I loaded up for a hail mary about an hour south in the town of Benbrook. Upon arrival, clouds were still intermittent, but there were breaks, and I was out of time. After a quick setup in a local park, it was time to image! The clouds were still passing by throughout, so I was constantly adjusting exposure settings to give myself the best chance of leaving with usable subs. Despite some major flubs on my part(Forgetting to save ALL the data from the 250mm FL rig), I was fortunate enough to make it home with some really great prominence shots during totality from the 1400mm FL rig. Enjoy!
- Celestron EdgeHD 8
- Celestron 0.7 Focal Reducer
- Celestron EclipSmart Solar Filter (Removed for this image)
- Tele Vue Solar Finder
- Celestron T-Adapter
- William Optics T-Mount for Nikon F
- Nikon D7500
- Intervalometer
- Sky-Watcher EQ6-R
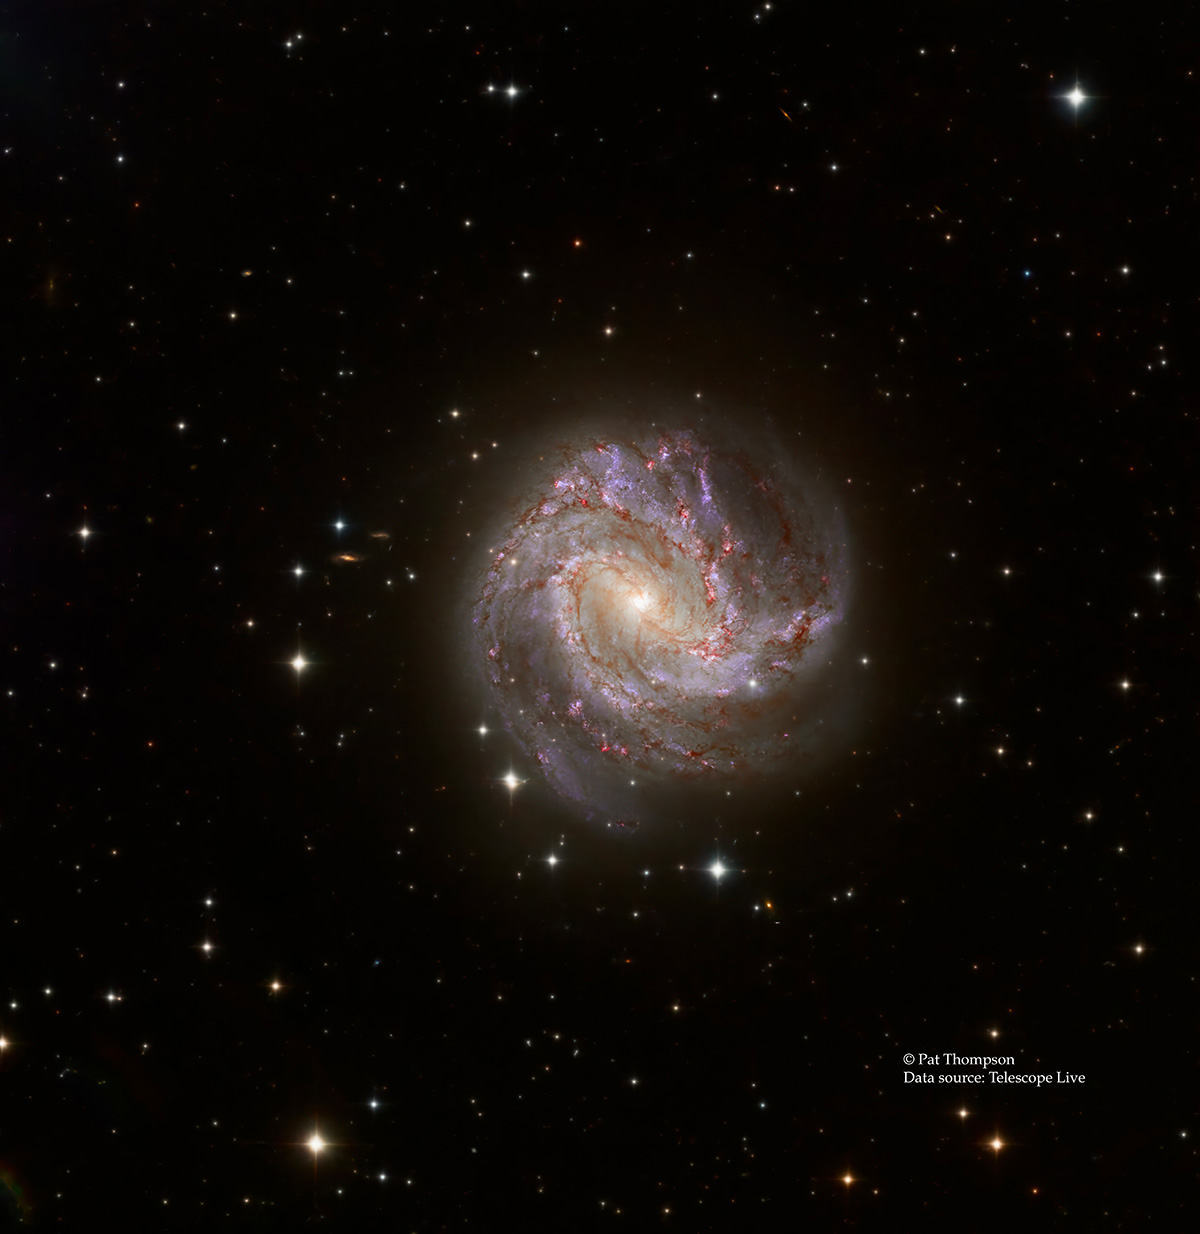
Messier 83, the Southern Pinwheel Galaxy. Approximately 15 million light years from Earth in the constellation Hydra. With a diameter of 55,000 light years it is about half as wide as the Milky Way. It has very active star formation in its core and arms. M83 is a captivating galaxy that offers significant insights into the workings of barred spiral galaxies and the processes governing star formation and galactic dynamics. Its accessibility and the wealth of visible detail make it a key object of study and observation in the field of extragalactic astronomy.
- Data captured over multiple nights spanning from 8 February 2021 to 28 March 2022.
- Telescope: Planewave CDK24
- Mount: Mathis MI-1000/1250
- Camera: FLI Prollne 9000
- Subs:
- 16 x 10 min L
- 14 x 10 min R
- 13 x 10 min G
- 13 x 10 min B
- (9.33 hours)
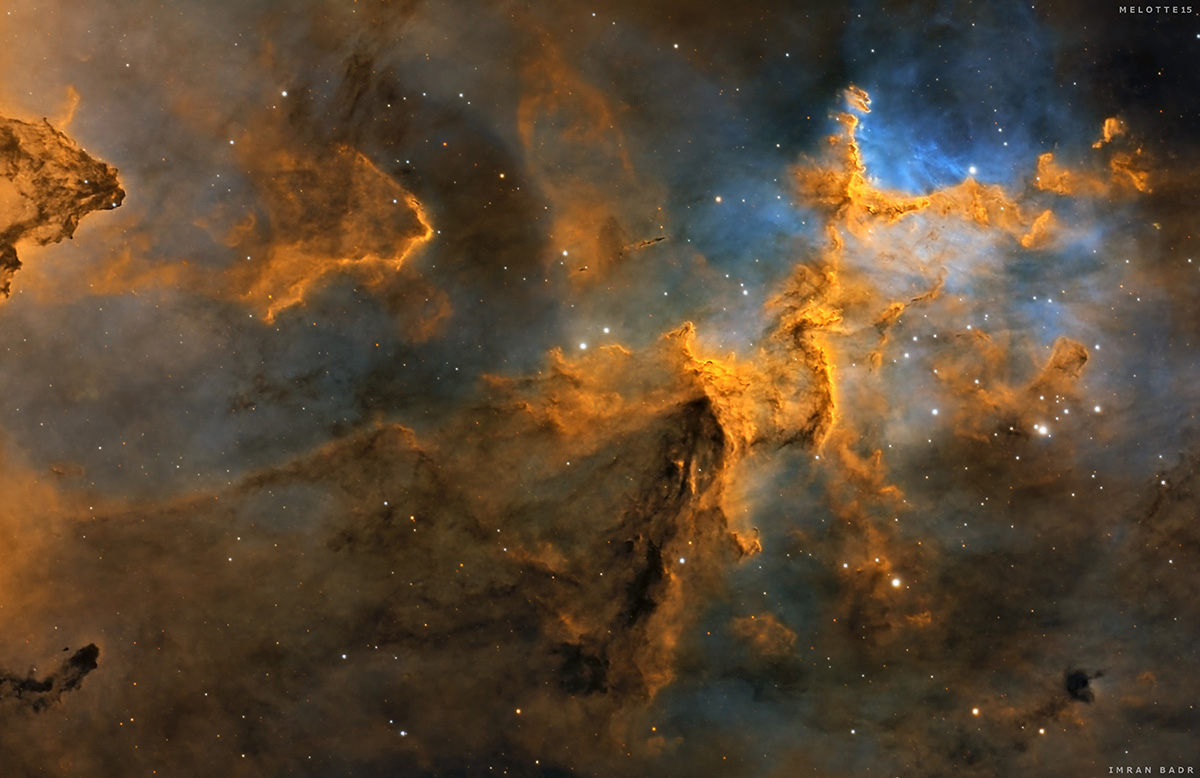
Towards the middle of the heart nebula, there is an open star cluster with stars nearly 50 times the mass of our sun. Radiation and heat from those massive stars have sculpted one of the favorite objects of the Astrophotographers. I fell in love with this object from the first 5-minute frame, so I continued to shoot S,H,O, R, G, B for a total of 60 hours. Captured all the data from my bortle 7 backyard in San Jose, CA during Nov 25 - Dec 8, 2023 using Celestron 9.25EdgeHD (f/10), Sky-Watcher EQ6Rpro, ZWO ASI2600MM Pro, Antlia 2.5nm S, H, O and V-Pro R,G,B filters.
- Imaging Telescopes: Celestron EdgeHD 9.25"
- Imaging Camera: ZWO ASI2600MM Pro
- Filters: Antlia H-alpha Ultra Narrow Band 2.5nm 2", Antlia OIII Ultra Narrow Band 2.5nm 2", Antlia SII Ultra Narrow Band 2.5nm 2", Antlia V-Pro Blue 2", Antlia V-Pro Green 2", Antlia V-Pro Red
- Antlia H-alpha Ultra Narrow Band 2.5nm 2": 238x300″(19h 50')
- Antlia OIII Ultra Narrow Band 2.5nm 2": 242x300″(20h 10')
- Antlia SII Ultra Narrow Band 2.5nm 2": 225x300″(18h 45')
- Antlia V-Pro Blue 2": 30x60″(30')
- Antlia V-Pro Green 2": 30x60″(30')
- Antlia V-Pro Red 2": 30x60″(30')
- Integration: 60h 15'
This image is the culmination of a month's work between Brian Puhl and Charles Hagen. Throughout the new moon we gathered just over 134 hours of data using three nearly identical scopes, one of which in the Southeast Arizona desert (Bortle 1) and the other two of which in Rural North Carolina (Bortle 4). Both of us have fallen in love with the Esprit 100ed for its sharpness and speed which made it perfect for such a delicate and faint target. Sharpless 224 was one of the first faint objects Charlie ever attempted to image, now nearly three years later he was ecstatic to have been able to get another attempt. This time around we decided to explore a bit and put some time into luminance from the SDSO Observatory in Bortle 1. To our surprise, we found that there is a striking amount of faint, rarely seen, IFN-like dust in the background, making the image all the more dynamic.
This image was certainly not without its challenges though. As this target is in a very dense star region, it was very difficult to control the intensity of the stars in the process. Charlie, using his Pixinsisght independent starless processing technique, as well as multiscale processing on the star layer, was able to reduce the intensity without compromising the aesthetics of the stars. We hope you all enjoy the image!
- Aquisition details:
- SDSO Observatory, Sunizona, AZ. Bortle 1
- Telescope: Esprit 100ED
- Camera: QHY-268M
- Filters: Antlia 36mm LRGBSHO 3nm
- Mount: AstroPhysics AP900
- Accessories: Moonlite Nightcrawler, QHY OAG-M, Pegasus PPB Advance
- Backyard Observatory, Hertford, North Carolina, Bortle 4 (20.7 SQM)
- Telescope: Esprit 100ED
- Camera: QHY-268M
- Filters: Antlia 2" LRGBSHO 3nm
- Mount: EQ6R Pro
- Accessories: ZWO EAF, Pegasus PPB Advance
-
- Telescope: Esprit 100ED
- Camera: OGMA AP26MC
- Filters: Antlia 36mm LRGBSHO 3nm
- Mount: EQ6R Pro
- Accessories: Optec SWX-30 Autofocuser, Pegasus PPB Advance.
- H-Alpha: 144 x 1200" (48 Hours)
- Oxygen III: 160 x 1200" (53 hours)
- Blue: 92 x 180" (4.5 hours)
- Green: 97 x 180" (5 hours)
- Red: 103 x 180" (5 hours)
- Luminance: 365 x 180" (18 hours)
- All data captured during the month of December
- 134 Hours in total.

The Sombrero Galaxy (M104) is one of the most striking looking spiral galaxies. It has a large central bulge, a bright nucleus, and spiral arms which pass through thick dust lane. It is edge-on to our seeing. The Sombrero Galaxy can be found in the constellation of Virgo. It's estimated distance from Earth is 29 million light years.
I captured data for this project from my backyard in San Jose, CA for a total of about 24h15m30s integration time using Celestron 9.25EdgeHD telescope, 0.7x reducer, ZWO 533MC Pro camera, SVBony 2" UV/IR cut filter, all mounted over Sky-Watcher EQ6RPro mount. Post processing was done using PixInight and Photoshop.
A higher resolution version of this image can be found at: https://astrob.in/5lbbsg/0/
- Acquisition Details:
- Imaging Telescope: Celestron 9.25EdgeHD
- Imaging Camera: ZWO ASI533MC Pro
- Mount: Sky-Watcher EQ6RPro
- Filters: SVBony UV/IR Cut 2"
- Accessories: Celestron 0.7x Reducer, ZWO ASIAir Pro
- Guiding Camera: ZWO ASI290MM Mini, ZWO ASI174MM Mini
- Dates: March 15, 2023 · March 28, 2023 · April 2, 2023 · April 9, 2023 · April 13, 2023 · April 14, 2023 · April 15, 2023
- Frames:
- SVBony UV/IR Cut 2": 444x180"(22h 12')
- SVBony UV/IR Cut 2": 245x30"(2h 2' 30")
- Integration: 24h 14' 30"
- Avg. Moon age: 18.41 days
- Avg. Moon phase: 53.88%
- Bortle Dark-Sky Scale: 7.00
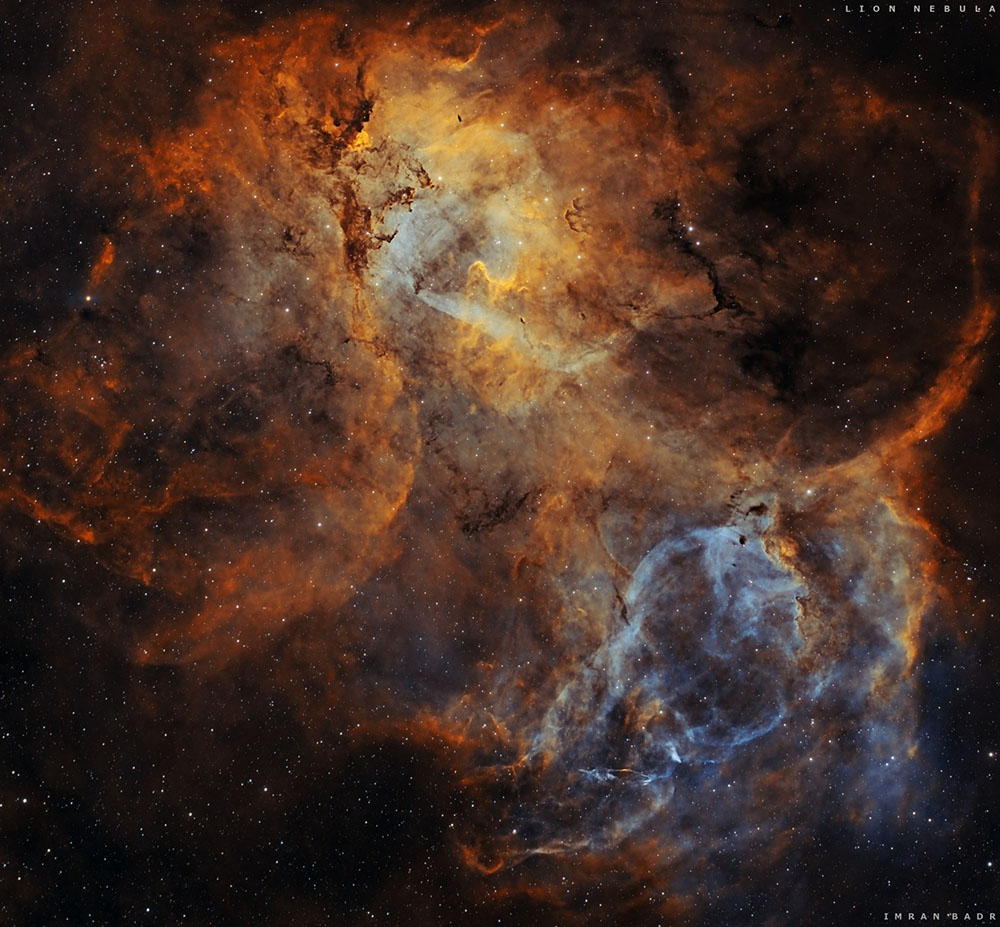
The Lion Nebula (Sh2-132) is a faint emission nebula in Cepheus. It is located at a distance of about 10400 light-years from us. The stars responsible for this show of colors by ionizing gases are very hot and massive, in particular, two Wolf-Rayet stars with the codes HD 211564 and HD 211853. I captured data for this project from my backyard in San Jose, CA for a total of about 46h15m integration time using Skywatcher Espirit100ed telescope, ZWO ASI2600mmpro camera, Antlia 2.5nm SHO filters, Optolong RGB filters all mounted over ZWO AM5 equatorial mount. Post processing was all done using PixInight and Photoshop. A higher resolution version of this image can be found at: https://astrob.in/78pnzo/0/
- Imaging Telescope: Sky-Watcher Esprit 100ED
- Imaging Camera: ZWO ASI2600MM Pro
- Mount: ZWO AM5
- Filters:
- Antlia H-alpha Ultra Narrow Band 2.5nm 2"
- Antlia OIII Ultra Narrow Band 2.5nm 2"
- Antlia SII Ultra Narrow Band 2.5nm 2"
- Optolong Blue 2"
- Optolong Green 2"
- Optolong Luminance 2"
- Optolong Red 2"
- Accessories: ZWO OAG-L, ZWO ASIAir Plus
- Guiding Camera: ZWO ASI290MM Mini
- Dates: Aug. 18, 2023 · Oct. 2, 2023 · Oct. 3, 2023 · Oct. 5, 2023 · Oct. 12, 2023
- Frames:
- Antlia H-alpha Ultra Narrow Band 2.5nm 2": 161x300"(13h 25')
- Antlia OIII Ultra Narrow Band 2.5nm 2": 156x300"(13h)
- Antlia SII Ultra Narrow Band 2.5nm 2": 172x300"(14h 20')
- Optolong Blue 2": 60x60"(1h)
- Optolong Green 2": 60x60"(1h)
- Optolong Luminance 2": 30x300"(2h 30')
- Optolong Red 2": 60x60"(1h)
- Integration: 46h 15'
- Avg. Moon age: 17.57 days
- Avg. Moon phase: 47.25%
- Bortle Dark-Sky Scale: 7.00
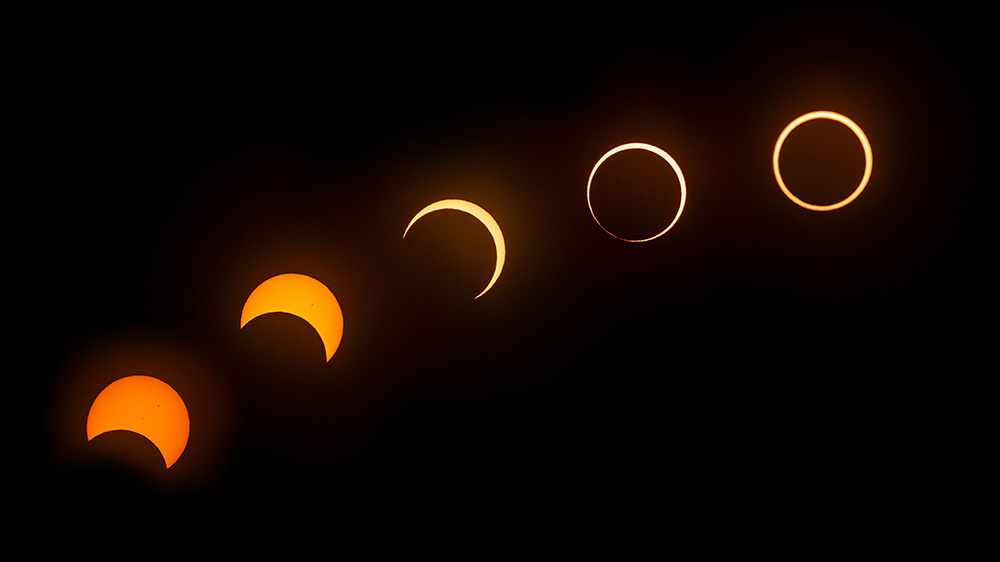
The best part about stargazing and solar observing is doing it with others. As you can tell from my equipment list this was no fancy setup. I deliberately aimed for simplicity to not distract from the experience. After some testing at home I realized how fiddly it was to even get a decent image of the sun. So I opted for a straightforward eyepiece and committed to just enjoying the event alongside my family, rather than being consumed by photographic concerns. However, as I shared the telescope with others during the eclipse, I found moments in between to spontaneously capture some photos. My approach was centered on cherishing the company of friends and family and savoring the overall experience, with the impromptu photos serving as bonus mementos. That day, I learned valuable insights about what matters in this hobby, realizing that, for me, it's about the people and the shared moments.
Equipment:
- Sony a6300 attached with a 3d printed adapter
- Celestron 80AZS with a Celestron EclipSmart Safe Solar Filter and a cardboard sunshade around the scope
- Basic video camera tripod
- Selected photos collaged in Photoshop CC
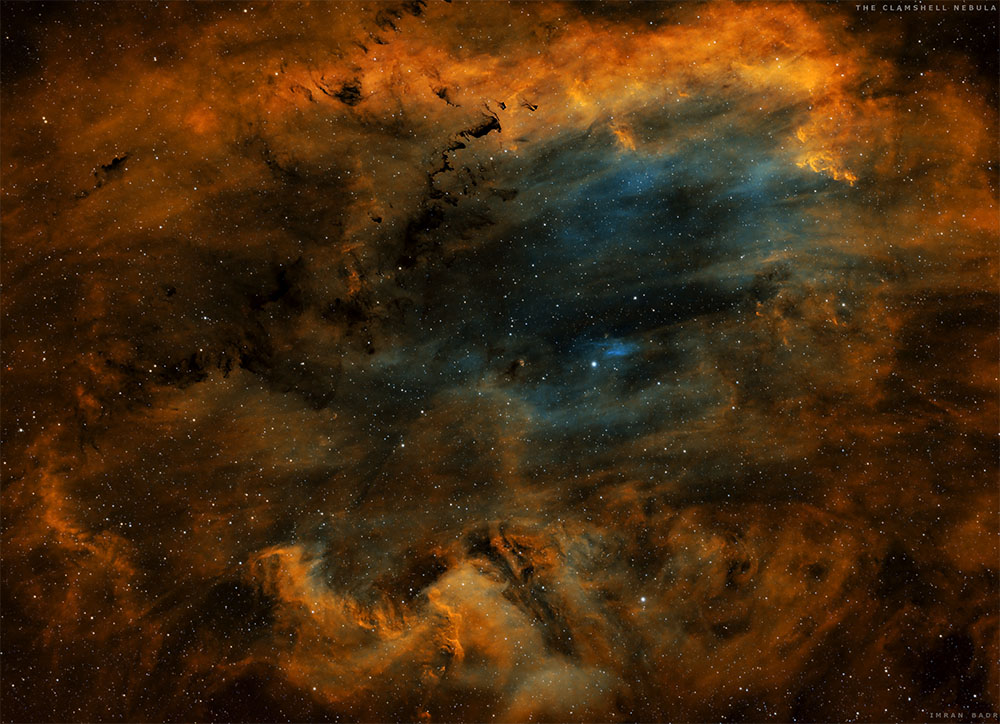
This is such a wonderful target but often overlooked. It is kinda challenging to process this data as some bright regions could cause problems. It is a large patch of emission in Cygnus at a distance of 2200 light years from Earth, just 2-3 degrees away from the very frequently images North American and Pelican Nebulae. This FOV has several bright patches and dark nebulae. You can see higher resolution of this image at: Astrobin. I captured data of this object from my bortle 7 backyard in San Jose, CA and processed in Pixinsight.
- Dates: Aug. 15, 2023, Aug. 16, 2023, Aug. 23, 2023
-
Sky-Watcher Esprit 100ED
-
ZWO ASI2600MM Pro
-
ZWO AM5
-
ZWO OAGL/ZWO ASI290MM Mini
-
Antlia H-alpha Ultra Narrow Band 2.5nm 2": 74x300"(6h 10')
-
Antlia OIII Ultra Narrow Band 2.5nm 2": 76x300"(6h 20')
-
Antlia SII Ultra Narrow Band 2.5nm 2": 75x300"(6h 15')
- Integration: 18h 45'
- Avg. Moon age: 11.77 days
- Avg. Moon phase: 13.80%
- Bortle Dark-Sky Scale: 7.00
This image was captured over 9 days (between 6/27 - 7/12) in Reno Nevada, from my Bortle 4 backyard. This was my first big project with the Explore Scientific ED127. But the moon was starting to kick at 50% June 27th. I decided to make the ALP-T filter put in some honest work, so if it was clear, I imaged. The moon was progressively getting brighter and brighter over the coming nights, but I stayed the course. After everything was said and done, I was at just under 34 hours worth of data (406, 5 minute frames). This is the result from that stack in Pixinsight, using a Foraxx derived pallet.
-
ES 127ED Triplet ~950mm f/7.5
-
HoTech SCA 2" Flattener
-
ASI2600MC-Pro
-
Antlia ALP-T 5nm dual band filter
-
406 x 300s
-
Sky-Watcher CQ350 Equatorial Mount
-
ASIAIr for Acquisition and Control
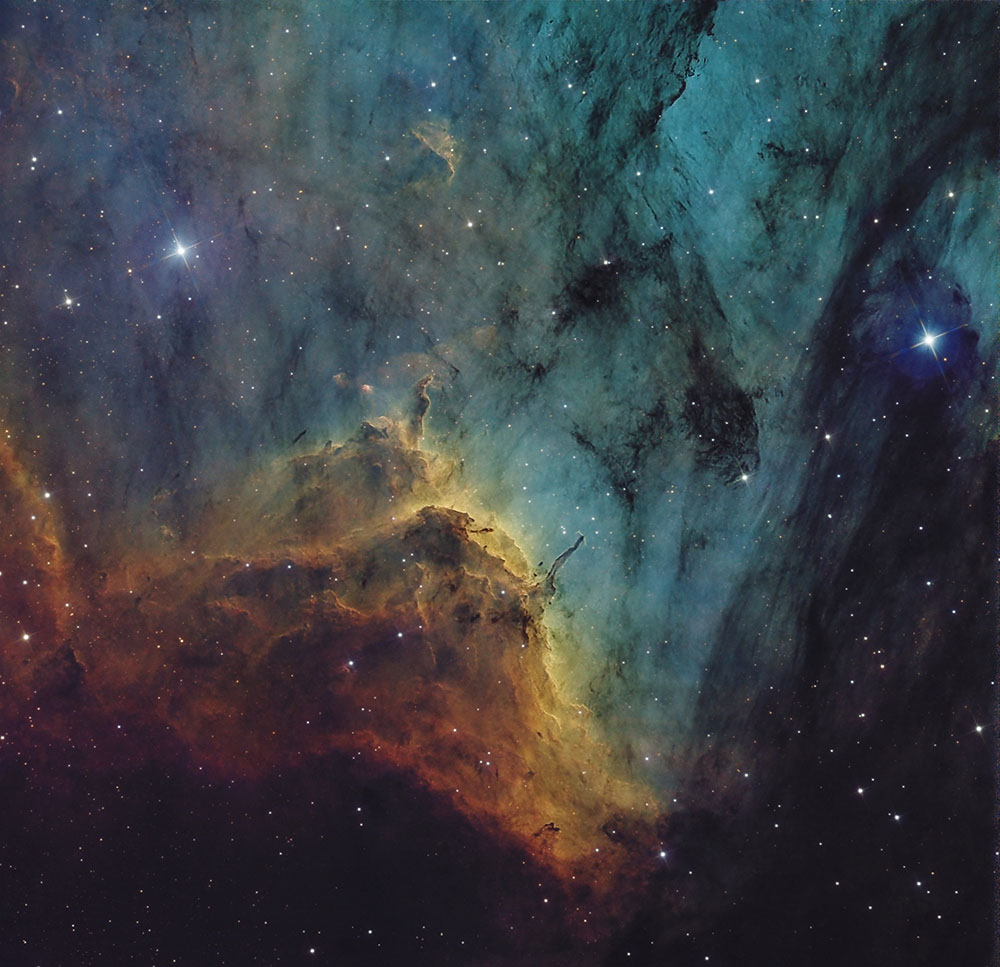
Tommy returns with an incredible view of the Pelican Nebula. Here are the capture details:
-
ASI533MM-Pro
-
Antlia 1.25" 3nm Ha/OIII/SII
-
Orion 10" Newt at 750mm fl f3
-
Starizona Nexus CC/Reducer
-
Moonlite Focuser
-
ZWO EAF
-
EQ6R-Pro
-
Ha- 40x180s, gain 100, -10c, bin1
-
OIII- 40x180s, gain 100, -10c, bin1
-
SII- 40x180s, gain 100, -10c, bin1
-
Total Integration: 6 hrs
I captured this image from my home in west Mobile, AL (Bortle 6). My usual setup is on my driveway between my home and my neighbor's home 20 feet away on a spot where I am shielded from most cultural lighting and can barely see Polaris poking out from the surrounding trees. Conditions are less than ideal, but I'm out there imaging almost every night I can!
- Celestron C9.25 SC XLT
- ZWO ASI533MC Pro
- iOptron GEM45
- Celestron 0.63X SCT Reducer
- Askar M54 OAG
- Blue Fireball Filter Drawer
- UV/IR Cut 2" Filter
- ZWO ASI220MM Mini
- ZWO ASIAIR Plus
I first removed the background gradient with GraXpert, then opened in PixInsight to finish processing with SPCC (w/ background neutralization), BlurXterminator, EZ Processing Suite's EZ Stretch, SCNR, StarXterminator (screen stars), Range Selection Mask with Local Histogram Equalization, Curves, Screen Combine Stars (pixel math), NoiseXterminator, ICC Profile Transformation.
As always, credit for the original work goes to God. He is the author of life and the ultimate creator. Thank you to my supportive family and friends! Thanks to Masters of PixInsight and Adam Block Studios for their thorough classes and instruction. Thank you to Daniel Fiordalis for developing this site which continues to be a supportive space for folks to share their creative endeavors in astrophotography.
The image is composed of 33.1 hours of data taken over seven nights between March 19 and April 10 of 2023. It was taken from my personal observatory in my backyard in Copley, Ohio.
The data was acquired with a SkyWatcher 300P Newtonian (12" f/4), a ZWO ASI2600MC main camera, a ZWO ASI178MM and ZWO OAG, a ZWO EAF, a SkyWatcher EQ8-R Pro mount, and a NexDome. NINA was used for imaging automation. PHD2 was used for guiding. Processing was done in PixInsight.

Tommy dazzles APOM again with this incredible capture of M106. Here are the acquisition details from Tommy.
Equipment
- ASI533MC-Pro / ASI533MM-Pro
- Orion 6" f4 newt / Orion 8" f4 Newt
- SW Quattro CC
- HEQ5-Pro
Image Details
- RGB- 265x120s, gain 100, -10c, bin 1x1
- Lum- 85x120s, gain 100, -10c, bin 1x1
- Total Integration: 11.5 hrs
This months image comes from Simon Cao in Southern California. Here are the details.
Here are the SH2-238 and SH2-239 reflection nebulae, surrounded by cosmic dust within the constellation Taurus. I took this photo from Wofford Heights, California (Bortle 3) with 3-minute sub-exposures for a total of 5 hours on the night of 11/26/22. I then stacked all the sub-exposures via stacking software (Astro Pixel Processor) and edited in Photoshop to produce the final image.
To take this picture, I used a dedicated color astronomy camera (ZWO ASI2600MC Pro) paired with the Rokinon 135mm camera lens without the use of any filters. I also used an equatorial mount (Sky Watcher GTi), an electronic focuser, and a guide camera - all controlled via a mini pc (the ASIAIR Pro).
This months photo comes from Tommy Lease in Parker, Colorado. Tommy was able to capture 2022 E3 (ZTF) in incredible details. Here is the information:
Here is my contribution to Comet 2022 E3. This was a really tough target to process because the comet is moving at a different speed than the stars. I had to process the stars and the comet separately, then remove the stars and add them back into the comet image using PixInisght. There are still some visible star trail artifacts that I couldn't completely remove, but overall Im happy with how this one turned out. Equipment and image details are below.
Equipment
- ASI2600MM-Pro
- Antlia 36mm RGB
- Orion 6" Newt
- Starizona Nexus Reducer/CC at f/3
- SW HEQ5-Pro
Image Details
- Red-25x60s, gain 100, -10c, bin1
- Green-25x60s, gain 100, -10c, bin1
- Blue-25x60s, gain 100, -10c, bin1
- 1.25 hrs total integration
- Acquired in NINA, Processed in PixInsight and Photoshop, Starspikes Pro
Huge thanks to Tom for submitting this incredible photo of IC63 for December's APOM!
Imaging from my backyard in Menifee, Southern California has always been a challenge. My bortle 6/7 skies are rapidly becoming brighter and getting to image higher magnitude targets is becoming rarer for me. I took a gamble on the "Ghost of Cassiopeia" Nebula using the Optolong L-Extreme filter in my imaging train. My goal was to get as much integration time as the weather would allow. I left the rig up for seven nights and took advantage of every night that was not cloudy, which turned out to be four of those seven. Because my light dome to the North is so high (about 40 degrees) I was limited to roughly 4 hours per night of data, which finally gave me 14.3 hours of integration time. My only newer method on this shot was to use a flashlight and white T-shirts for my flats. These turned out to be much more beneficial in the final stack than my "twilight sky" method of flats.
- Scope: 13.1" Newtonian f/4.5
- Camera: modded Canon 6D, L-Extreme (7nm h-alpha and Oiii)
- Mount: EQ6R
- N.I.N.A for capture, focusing, framing and sequencing
- 175 300-seond lights taken at 3200 iso
- 30 darks
- 20 flats
- 20 dark flats
- 20 bias
The final image is much brighter than most "ghost" images I've seen. My reasoning here was that as I stretched the data there was so much detail in the head (IC 63) that I wanted to get as much as possible without blowing out the highlights. I also decided to keep Navi (gamma cass) in the shot; it just looks like the nebula is reaching out toward the star!
My workflow is all in Photoshop CC and consists of
- Slight linear stretch after stacking in DSS
- Russell Croman's Star XT
- Isolating the stars and adding back in as a "color dodge, add" layer in Photoshop
- Multiple levels and curve stretches
- Separate masks for color, detail and vibrance
- Several overlay layers to enhance contrast in certain areas
- Background equalization
- Slight final star reduction and star enhancement for color and detail
- Russel Croman's Noise XT as a final NR
Thank you all for sharing your remarkable shots with me and the world. And thanks to Daniel Fiordalis for making this site happen! This is such a great forum to share our new and old ways of doing things in a non-threatening and supportive environment. I continue to enjoy learning form you all. My goal is to worship God through these shots for as long as I can-He makes them; I just capture them!
Blessings and abundant clarity,
Tom

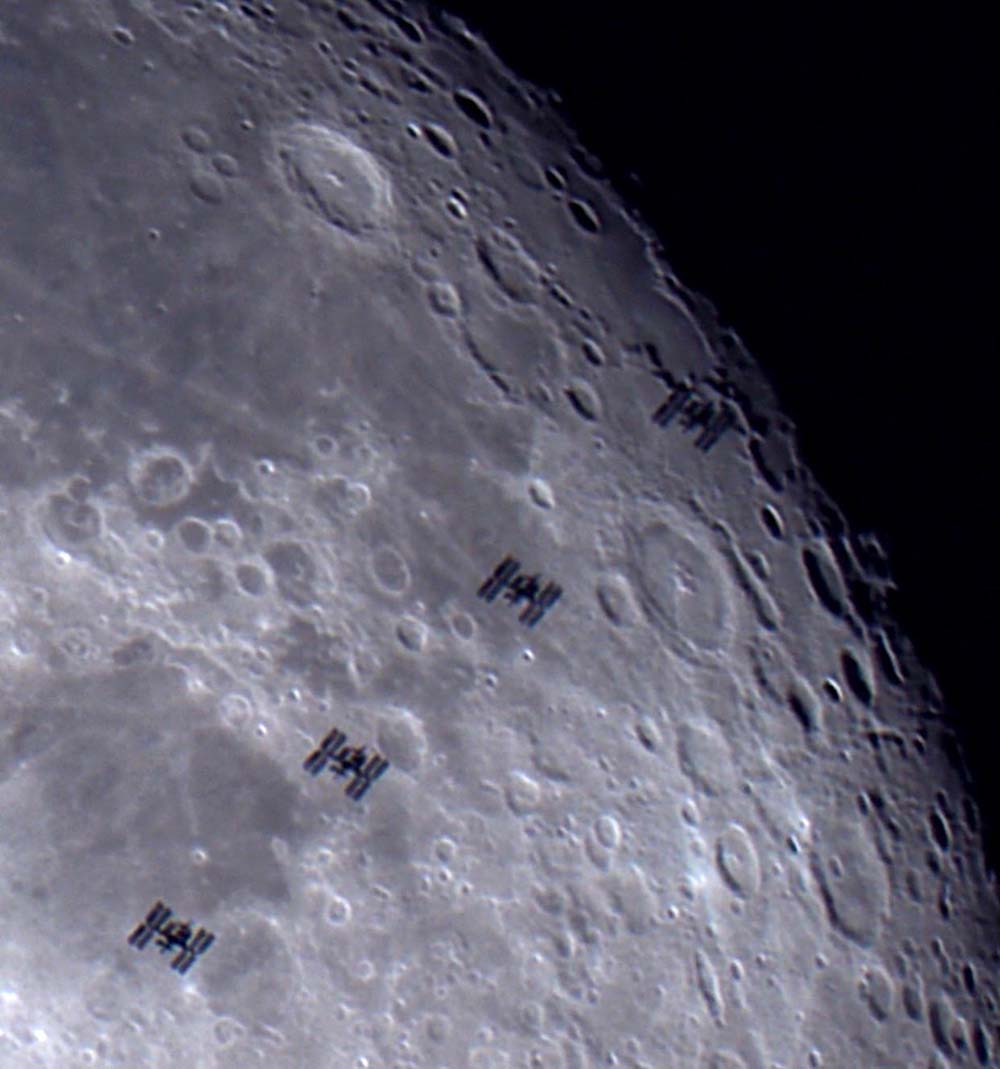
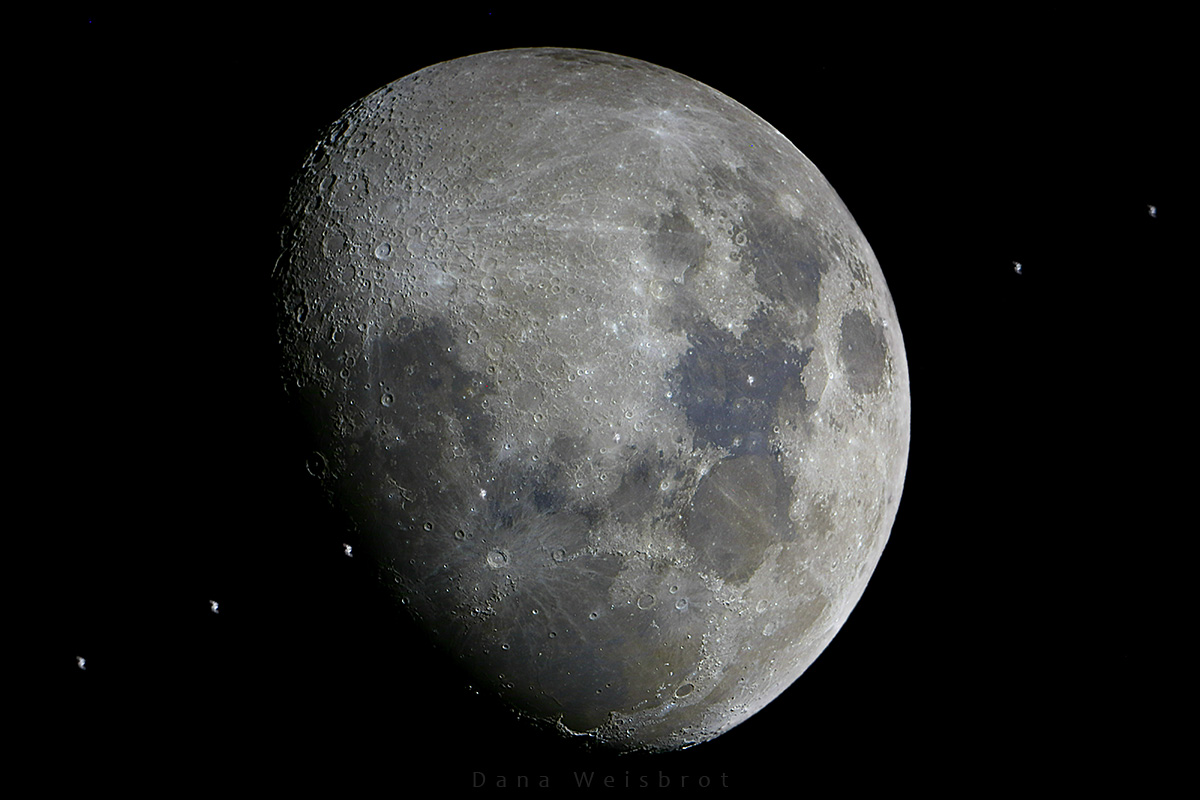
Dana Weisbrot once again blows our minds with an incredible capture of the ISS transiting the moon. Here are the details...
This image was taken November 9th, 2022 in Stamford Connecticut. I was shooting from the Springdale Elementary School baseball field parking lot, which is coincidentally the elementary school I graduated from 39 years ago! I used a Celestron C9.25 working at F6.3 paired with a ZWO asi294mc pro shooting 19 fps. This image is comprised of all the frames of the video that contained the ISS which were blended together. Even with the focal reducer, the bottom of the Moon didn't fit in the FOV, so I had to blend that in later also from a separate shot I took a few minutes after the transit. If anybody else is interested in doing these types of shots, I use Transit-finder.com to find transits happening close to home.
Since the ISS was in shadow I had to rely on the time from a well calibrated clock. I use dimensions 4 to update my laptop time. Five seconds before the transit time I start to record the video. When I see the ISS pass I stop the video. I use PIPP to extract all the frames into Tiff files then find the frames with with ISS in them. I then blend them together using Gimp. Camera settings: Gain: 197, Exposure : .5 ms.
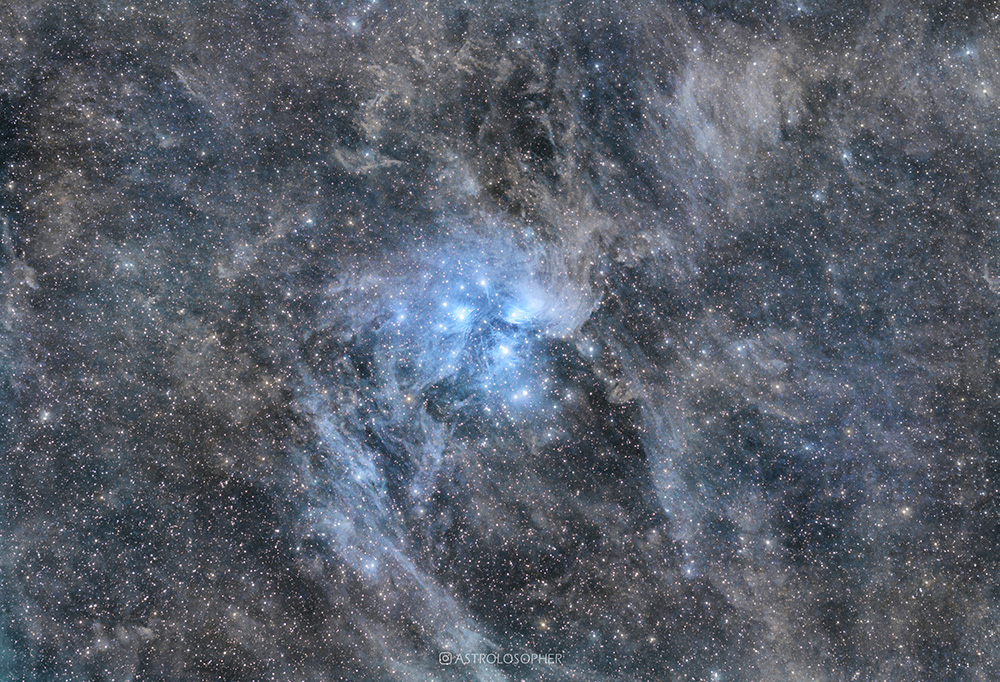
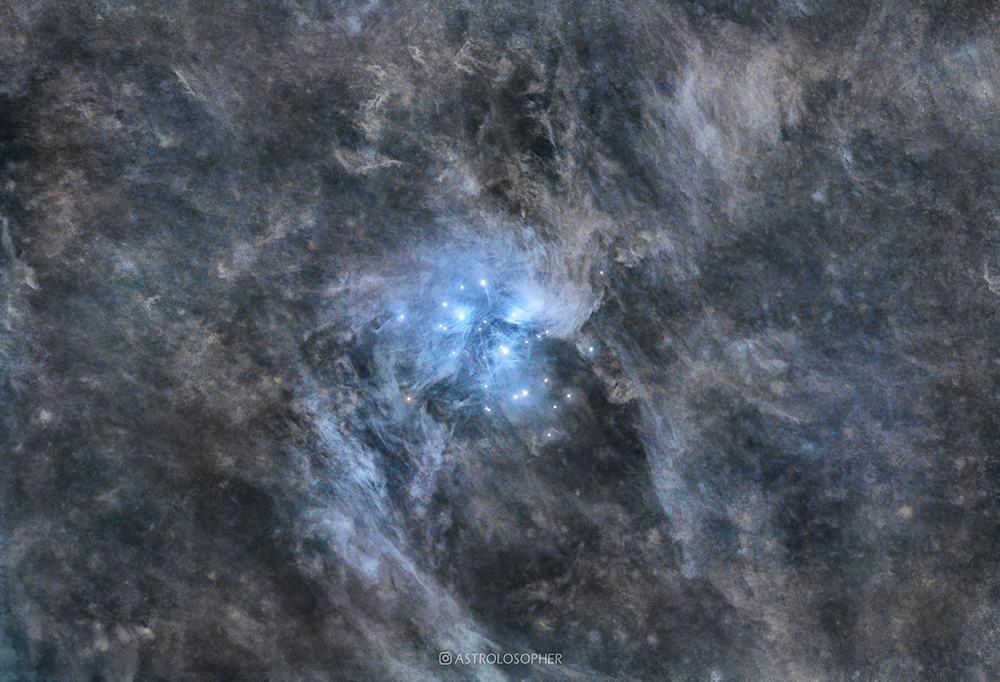
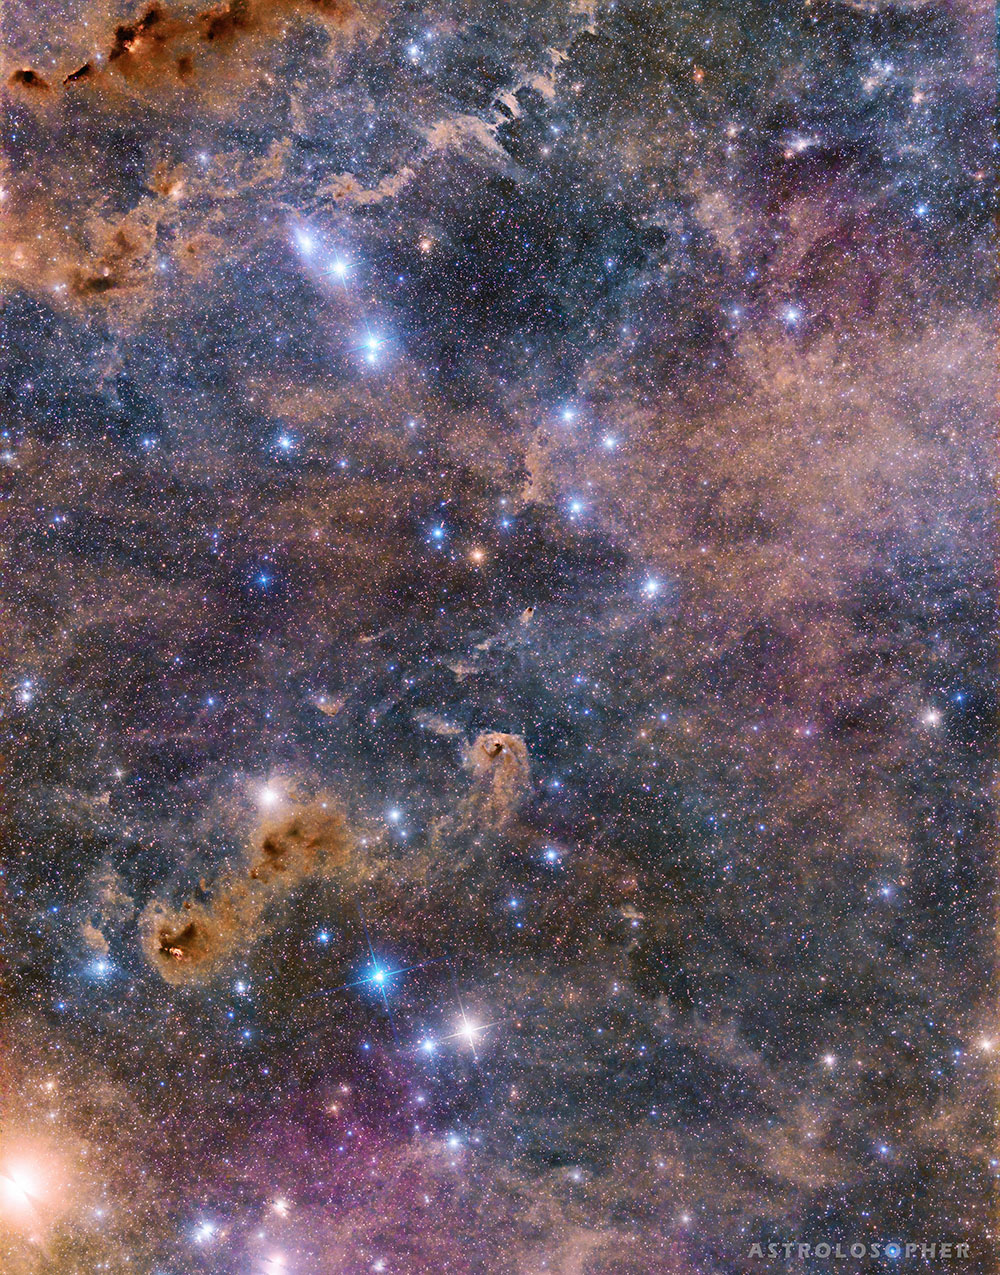
This months photo captures the Pleiades and the surrounding area including the dust clouds. Simon also submitted a "starless" version of the image which really enhances both the Pleiades and the dust surrounding the open cluster. Here are the details...
I took this photo in Yucca Valley, near Joshua Tree, California, aggregating over a hundred 3-minute sub-exposures (5 hours total exposure time) over the course of 3 nights (9/8/22 - 9/10/22). I then stacked all the sub-exposures via stacking software (Astro Pixel Processor), and edited in Photoshop to produce the final image. With darker skies (bortle 4) and a fast lens (I had it at F2), I was able to capture some of the fainter dust surrounding the "Seven Sisters" - something I've never really attempted before from my apartment in the city.
This image was taken with a dedicated color astronomy camera (ZWO ASI294MC Pro) paired with the Rokinon 135mm camera lens while using a UV/IR cut filter. I also used an equatorial mount (Sky Watcher GTi), an electronic focuser, and a guide camera - all controlled via a mini pc (the ASIAIR).
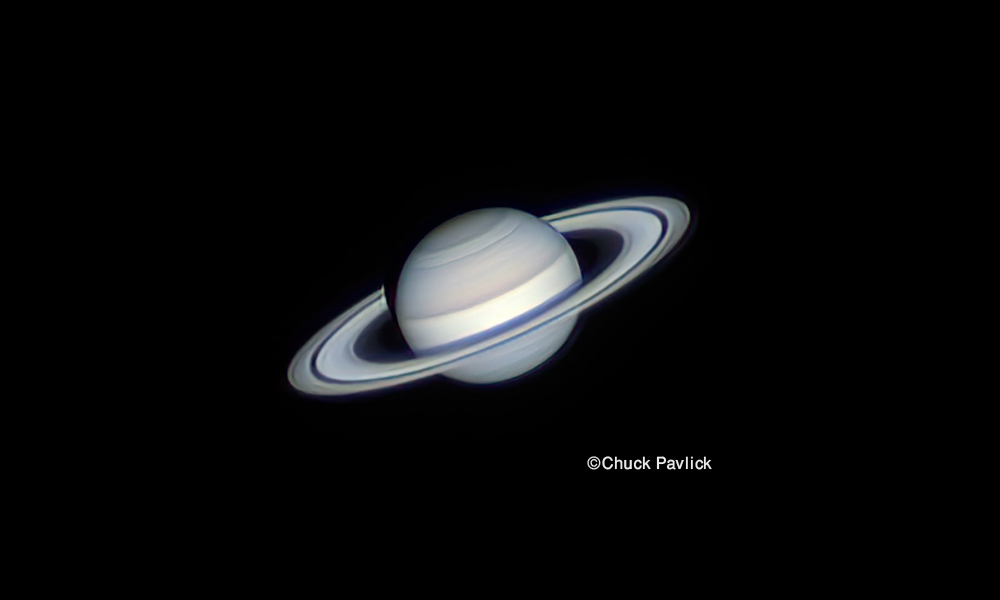
This month's planetary photo comes from Cape Coral, Florida. Thankfully Chuck made it through Hurricane Ian safely, and we're so thankful to have him contribute such an incredible photo! Here are the details.
I took this image from my backyard in Cape Coral, Florida. We have very good skies here for solar system imaging so my seeing ranges from 7/10 to 9/10 almost every time I get out. The seeing is very important to image the planets. That rare occasion that I do get bad seeing my images are blurry no matter how many frames I take. I've been using ASICap video capture to capture the images and I try several stacking programs and pick out the best pic to start with. I also try different wavelet applications in Registax and Astrosurface to get the smoothest image. I just started to use Affinity for main photo editing, and Topaz denoise or Topaz sharpening to do final processing if needed. I did use Topaz sharpening on this image but try to do the least amount possible. Astrosurface was used for most of the processing and Affinity to color balance and curves.
This month's beautiful image comes from David Jenkins in Ayr, Ontario, Canada.
The Majestic Elephant's Trunk. From my Bortle 5 backyard, I captured just over 15 hours of data in S,H, and O filters through my 100mm refractor to reveal the faint dust within this iconic summertime target. Each subexposure was 5 minutes in length and all were combined and stacked in PixInsight.
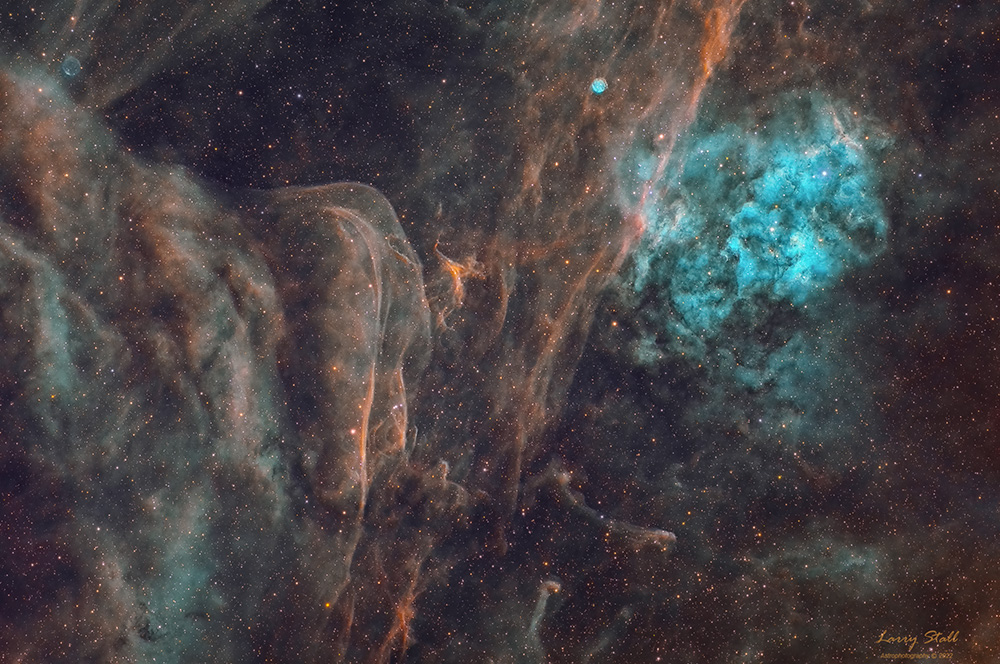
This month's incredible photo comes from Milton, Wisconsin. Larry Stall explains the specifics in capturing Sharpless 115 in such incredible detail.
A chaotic patch of sky in Cygnus, including Sharpless Sh2-115 and Sh2-116, planetary nebulae Abell 71 (PK085+04.1), Weinberger 1-10 (PK086+05.1), and various Lynde's Bright and Dark nebulae.
Captured Jun3 27-29, 2022. About 10 hours' integration consisting of 45x90" RGB, 67x180" Ha, 52x180" OIII, and 58x180" SII. Calibration, stacking, and processing done in PixInsight, final adjustments in Photoshop CC.
I had imaged the main nebula Sh2-115 (large blueish structure), previously in narrower perspective from different angles. I decided to try a wider angle with the APS-C camera and the Baby Q, and de-center the large nebula to pick up surrounding darker structures. The faint bubble-like planetary nebula (Weinberger 1-10) at the upper left was a complete surprise.
- Imaging Telescope = Takahashi FSQ-85EDX
- Imaging Camera = ZWO ASI2600MM Pro
- Mount = iOptron GEM45
- Filters = Astrodon 36mm LRGB Gen 2, and 5nm SHO
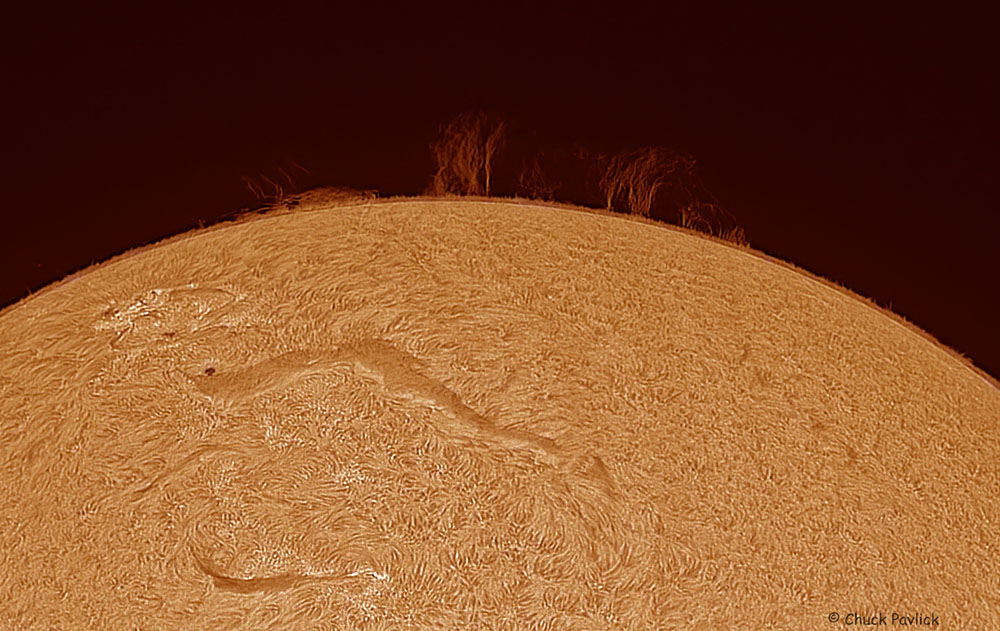
It seems fitting that the winning photo during the month of summer solstice is an incredible capture of the sun and the filaments reaching from the surface. Chuck captured this photo from South West Florida. Here are the details.
I live in SW Florida and took this shot in my backyard. I used the Lunt 60 Tha single stack with a 2x Televue barlow and the ASI1600mm camera. Acquisition was done using ASICAP and stacking was done in AutoStakkert using 450 of 600 frames, Seeing was very good. I used wavelets in Registax to sharpen and then added the false color in Photoshop. This is a single image and not a composition of the surface and the prominence. I accomplish this by setting the exposure and gain and sometimes boosting the gamma up a little so to get the surface detail and see a little of the prominence. When taking this to Photoshop I use shadow and highlights which makes the prominences pop out and with the sliders you can control the surface and proms. This technique only works on the brighter prominences. I also used Topaz denoise to smooth out the background.
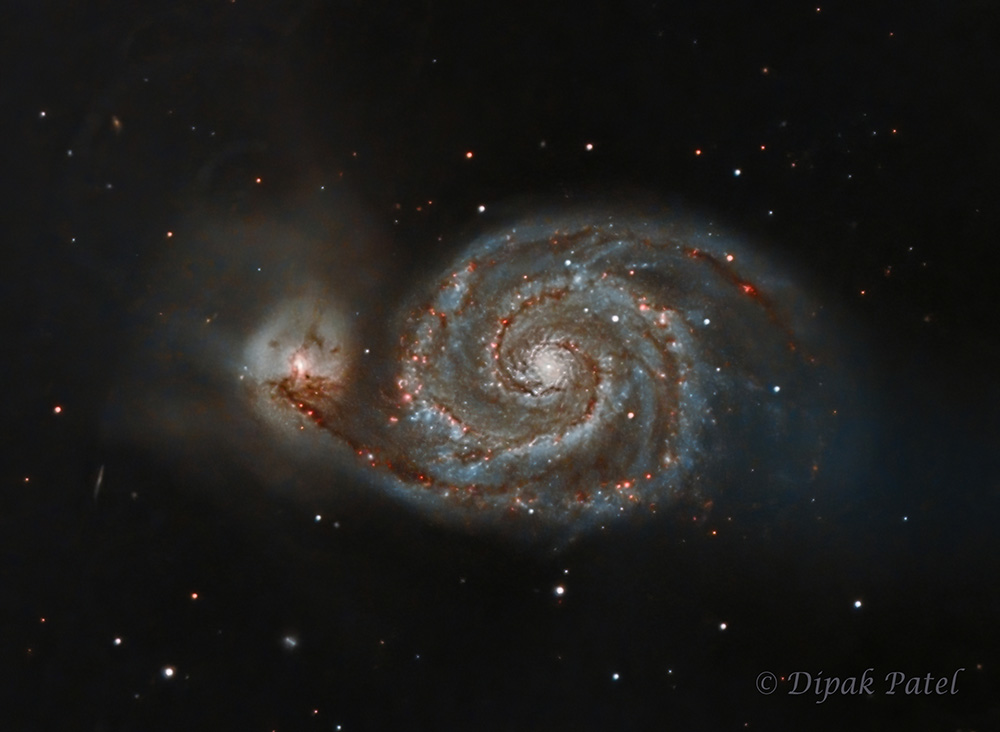
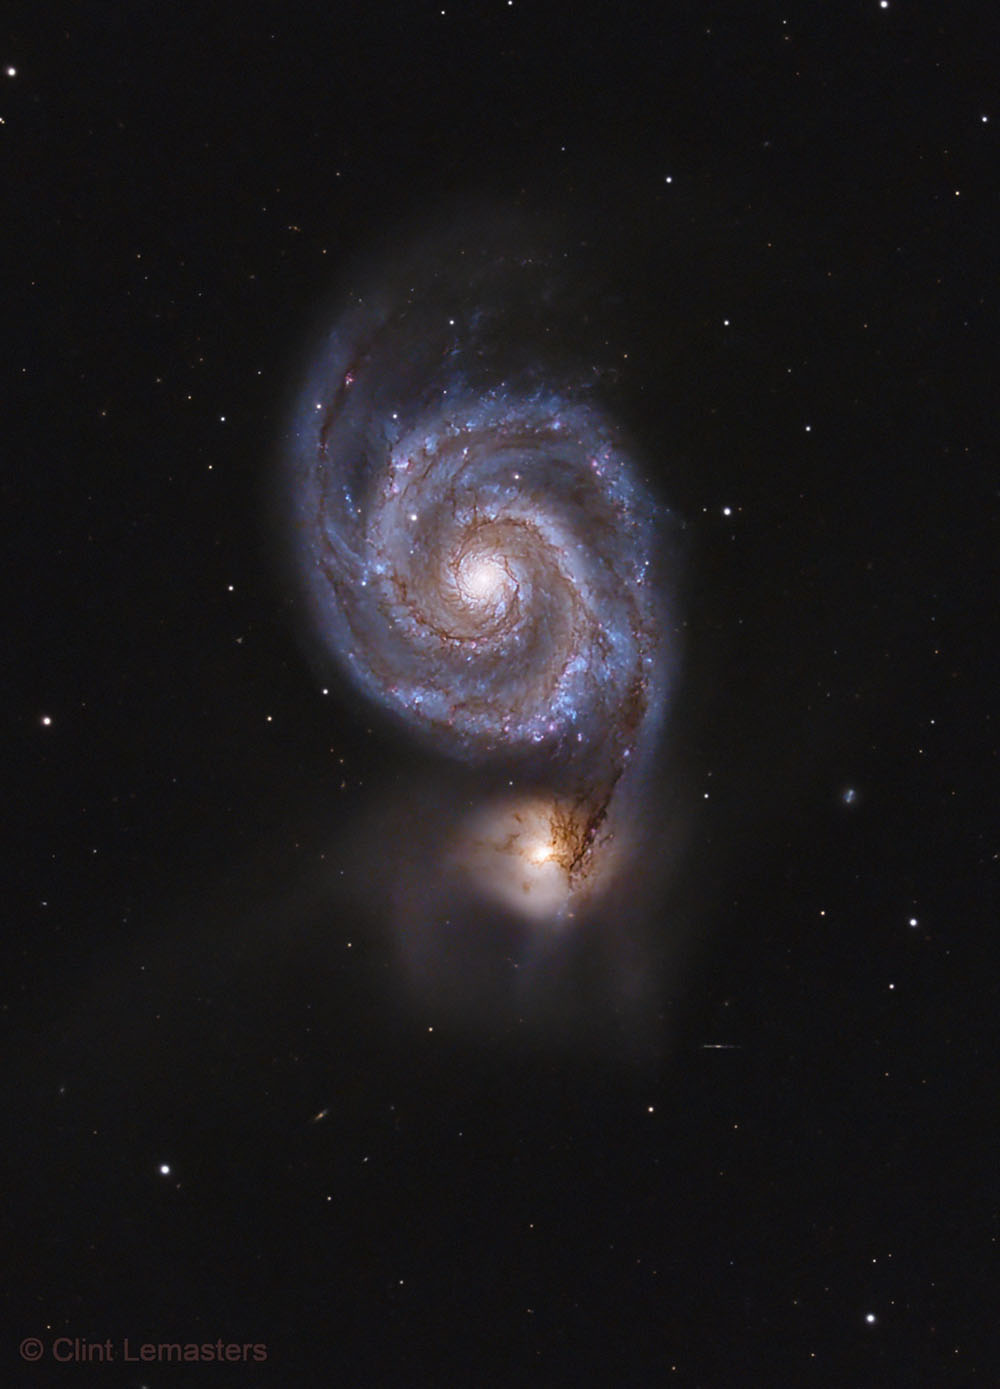
This months photo comes from the Afton Forest Preserve in Illinois. Dipak Patel captured the The Whirlpool Galaxy in beatiful detail!
Details:
- Scope: Celestron 8" EdgeHD
- Camera: ZWO ASI2600MC
- Guider: ZWO Off-Axis w/ ASI290MM mini
- Filter: Optolong UHC
- Mount Ioptron CEM70
- Integration Time: 5 hours 6 min (180s subs)
- Processed in Pixinsight and touchup in Topaz Denoise
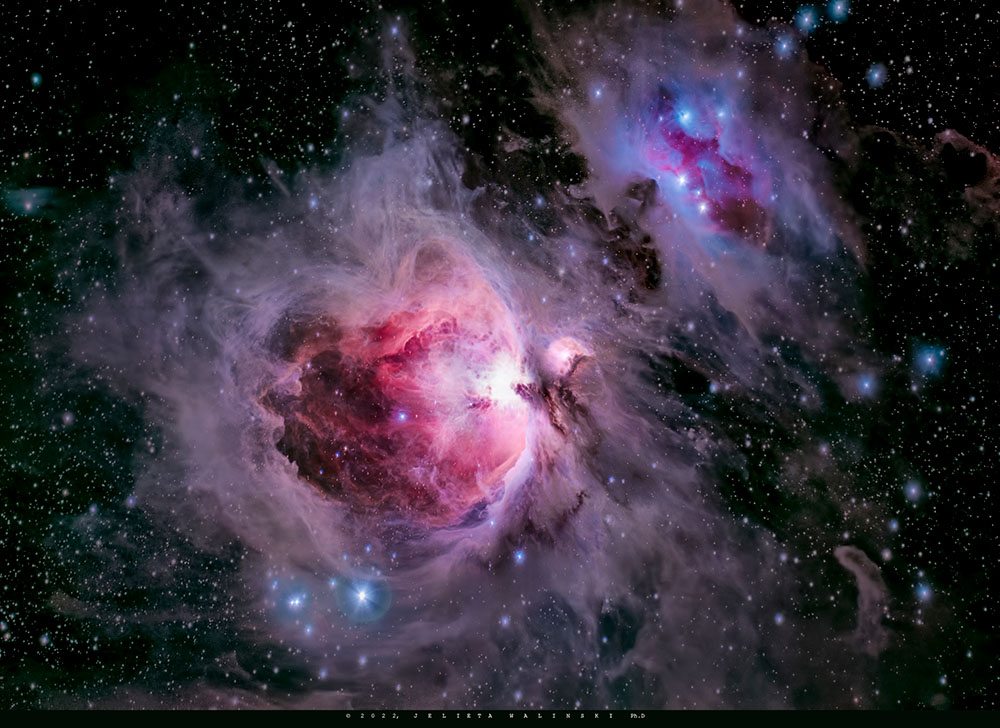
This months photo comes from a journey to the dark skys of New Mexico. Jelieta (Gigi) captured this stunning photo of the Orion nebula in stunning detail! Thank you so much for the story, Gigi!
Details:
- Telescope: Celestron Nexstar Evolution 9.25
- Mount: Sky Watcher EQ-6R PRO
- Camera: ZWO - ASI2600MCPRO
- Starizona Hyperstar 4 HS4-C925
- Optolong L-Pro 2" Multiband Pass Filter
- ZWO 30F4 Miniscope and ZWO Asi 462MC Planetary Camera
800 frames of lights, 100 frames of flats, 100 frames of darks, 100 frames of biases were downloaded through Bridge, Stacked in Deep Sky Stacker, processed in Photoshop.
Actually, I don't know if I can duplicate or replicate the same result because what matters most when capturing deep dark sky object is how much night sky pollution is present when you capture the images. I processed some of the images I captured for 4 months of travelling south but each image is different from each other.
Before we travelled south my husband James bought me Pixinsight, but I can't use it for my images editing since it is complicated and I don't know where to start. So, I stacked all the images in Deep Sky Stacker and processed the image in Photoshop. I used the basics in Photoshop, after all some users said, "Great image is great image!" I used the RAW editing, levels, and curves. That makes it so simple to me too because I spend the whole night standing in the dark stargazing while my gear capture the frames and sleep in the day time. A woman who was born in the tropic braving a long stinging frigid winter night. It was a big challenge to myself because I spent my 40 years in warm weather, for what I do now is Life Changing! While setting up my telescope people were passing by and became curious and were asking me questions like... Are you an astronomer? Do you have backgrounds in Astronomy? My answer was, "No, I was an Elementary Mathematics Teacher, but I have tremendous LOVE of the night sky and I have intense curiosity to discover something in the dark night sky!"
At the middle of the bitter cold nights when I already have frozen hand and running nose I said to my self, "No Pain, No Gain!" and, don't ever stop for you only have started your quest!

This months photo comes from Jim's backyard in Indiana and captures NGC2264 in beautiful detail. The image contains a widefield view of the Cone Nebula and the Christmas Tree Cluster.
Details:
- Scope: Fsq-106edx4
- Camera: ZWO asi6200mm Pro
- Filters: Astrodon 2" x 5nm NB filters and LRGB tru-color genII filters all held by a Zwo EAF 7×2 filterwheel
- Mount: Ioptron gem45
- Integration Time: 25.6 hours of data
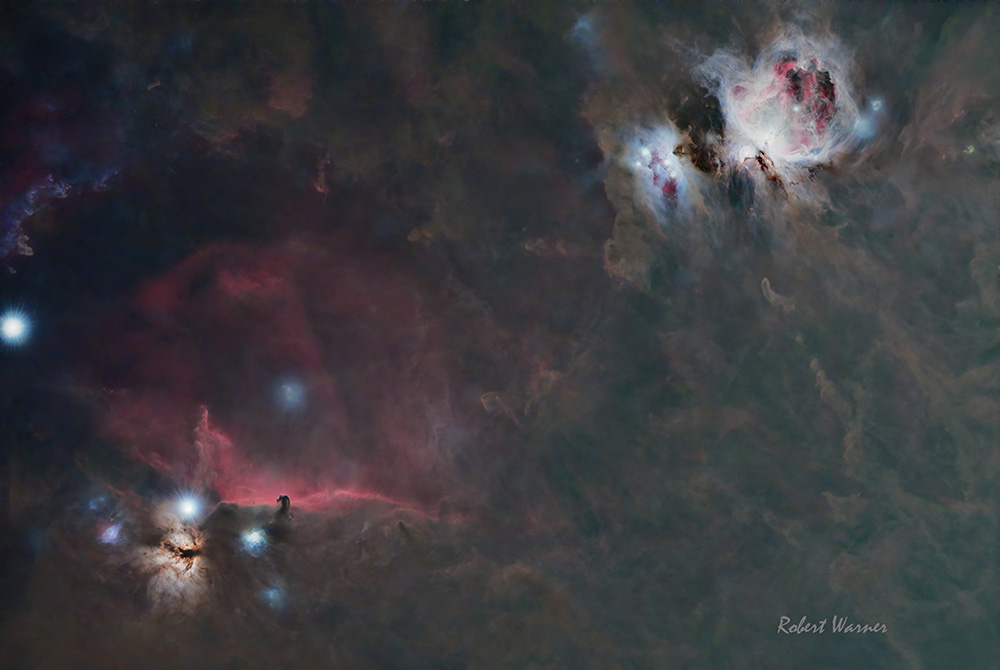
This months photo arrives from Del Rio, Texas and shows the dense nebulosity of Orion, Horsehead, and Flame nebula as well as the surrounding area. Additionally, the removal of stars in the image field gives us a new perspective of this popular area of the sky. Thank you so much to Robert for sharing this photo!
Details
- Scope: William Optics Redcat51
- Camera: ASI 2600MC Pro, no filters
- Guider: ZWO 30mm Mini guide scope w/ASI 120MM Mini, and the ASI Air Pro for aquisition and guiding
- Mount: EQ6-R Pro mount
- Processing in PixInsight and star removal with StarXterminator.
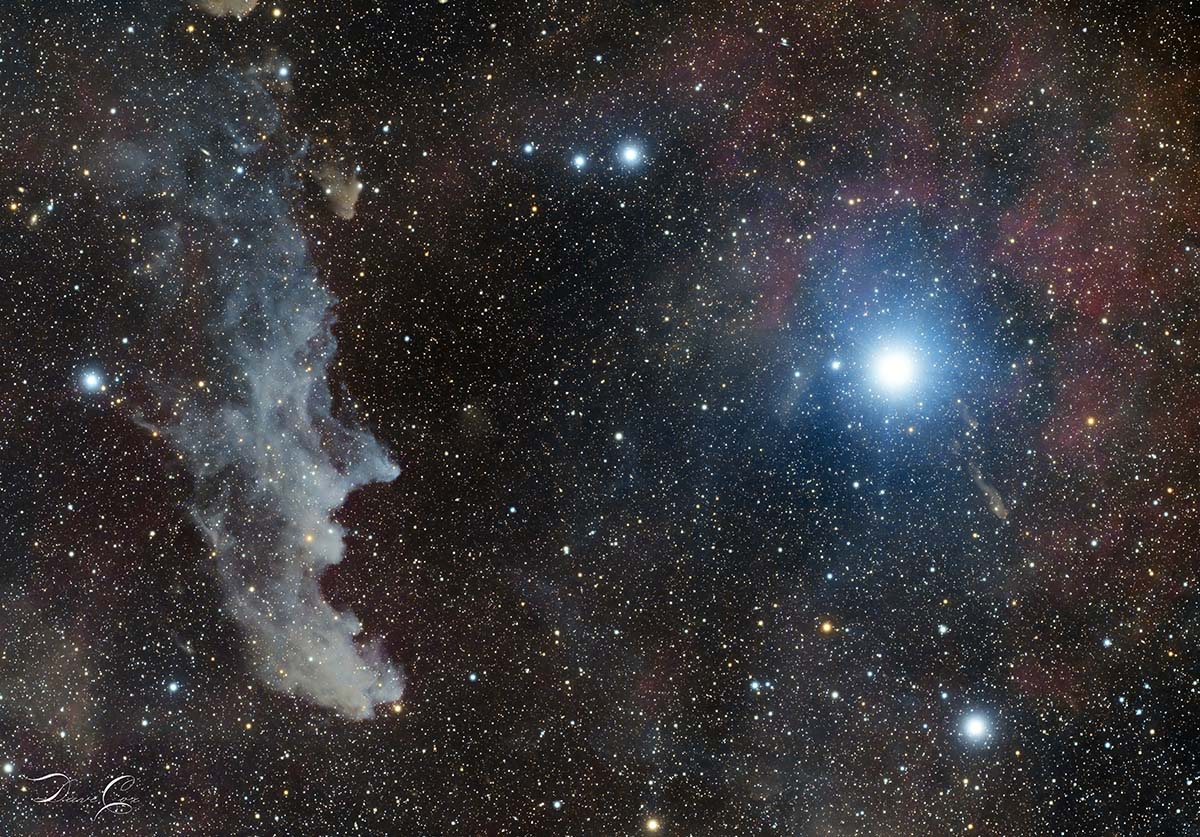
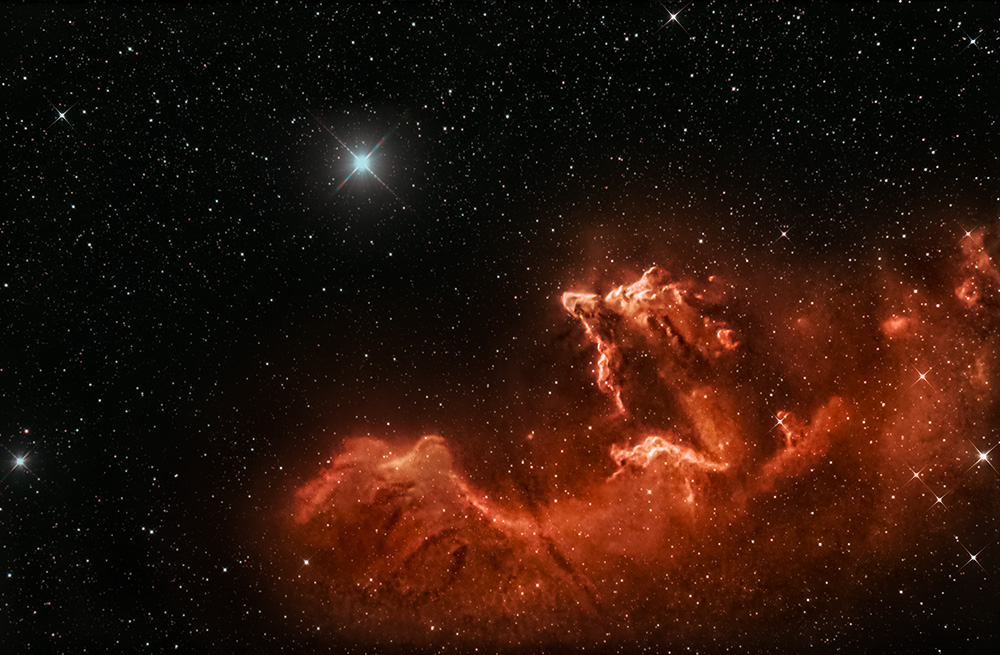
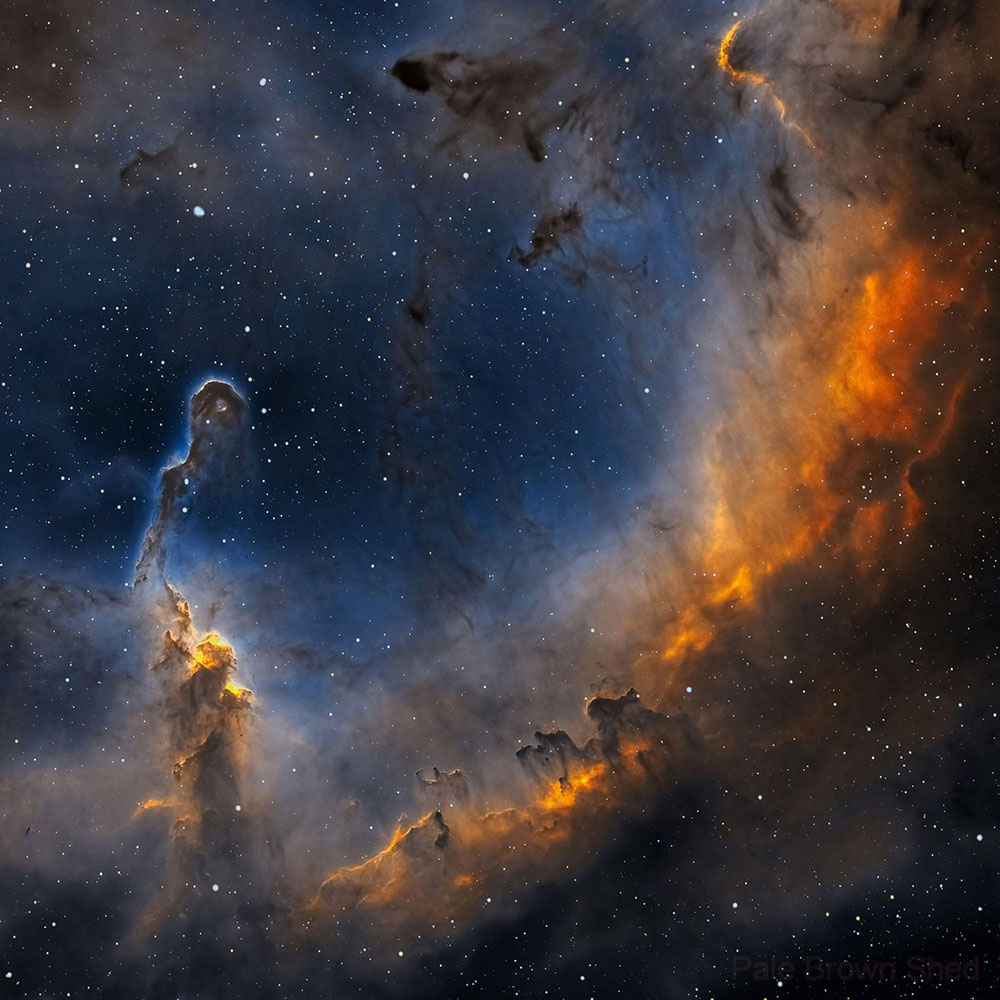
This months photo arrives from Ranger, Texas and makes out the intricate details in the Witch Head Nebula. David's process for capturing this beautiful photo follows.
For this image, I used 70 x 3 minute subs at gain 50 with no filters (aside from the installed IR/cut filter). Stacked in Astro Pixel Processor using default settings. Once stacked, I used Pixinsight to do a generic workflow including Crop, Photometric Color Calibration, EZ denoise, EZ soft stretch, then some star reduction and color saturation. Once done with Pixinsight, it was over to Photoshop to do some finishing touches including Camera Raw Filter to adjust appearance of the image to taste and a little Topaz Denoise to smooth it out a bit.
Equipment
- Scope: William Optics Redcat 51
- Camera: ZWO ASI2600MC
- Mount: Skywatcher EQ6-R Pro
- Acquisition Software: Sequence Generator Pro, PHD2
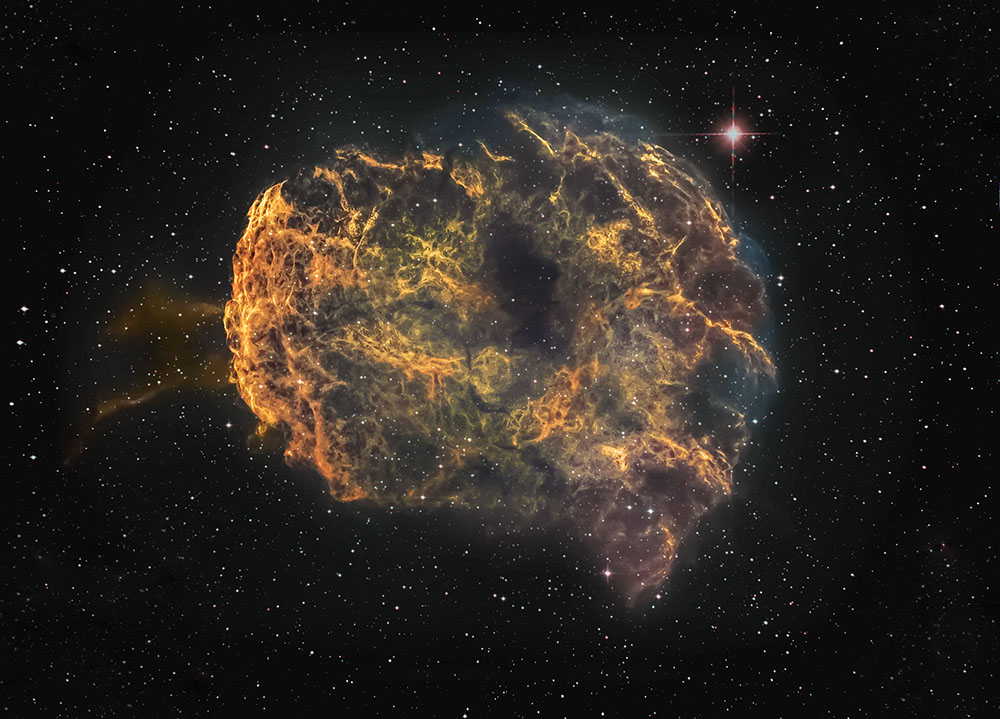
Tom Marsala captures the Jellyfish nebula in beautiful detail with long integration time from his backyard in Menifee, California. Here are the details from Tom.
"The Jellyfish experiment" Well, more of an experiment for me than for others. This was my first attempt at the Jelly AND a long integration (long for me, anyway). Up until this photo, my longest integration time was 10 hours and that was before I modded my Canon 6D, so this one was a real exciting opportunity. We had a huge high-pressure dome over SoCal that week, the humidity was low and the transparency was excellent the whole week (AND the moon was new!). Using the Optolong L-enhance filter on my modded 6D, I shot 270 4-minute, guided exposures @3200 ISO for three nights straight, with darks (30) and flats. I used my homemade DIY ultralight-weight truss 13.1" Newtonian mounted on my EQ6R mount (if you recognize the 13.1" size, then, yes-that used to be a Coulter Odyssey1 1 Dob from my youth!). I combined in Deep Sky Stacker, aligned the RGB in the histogram, and processed in Photoshop CC. My equipment is pretty crude by today's ZWO and APO standards, but I am attempting to squeeze every ounce of capability out of it!
My continually evolving Photoshop workflow consists of
- Removing the stars using RC-Astro's Star X-terminator plug-in (I recommend over starnet, even though it costs $59) and creating a separate star layer
- I subtracted a synthetic flat on this one. I'm still learning how best to use and manipulate flats-synthetic or from the camera
- Multiple curves and levels
- Texture and clarity layers
- Color enhancement using selected highlights and various masks
- Adding in a separately processed monochrome layer as an experiment as a luminance layer (aided in sharpening and reducing noise). I really liked how it worked!
- Final noise reduction
The integration time of 18 hours really aided in keeping the noise down during stretching. Using an uncooled DSLR is always a challenge but with winter I can keep the subs pretty cool! I have never considered any shot that I have taken to be even close to being compared with the amazing shots that you all post here. My equipment is fairly standard and mediocre, but being able to finally get to this point in my 43 year amateur career where I am actually shooting and processing with you guys is a HUGE blessing for me! I have learned so much from all of you and am inspired by your shots every day! Keep up the good work!
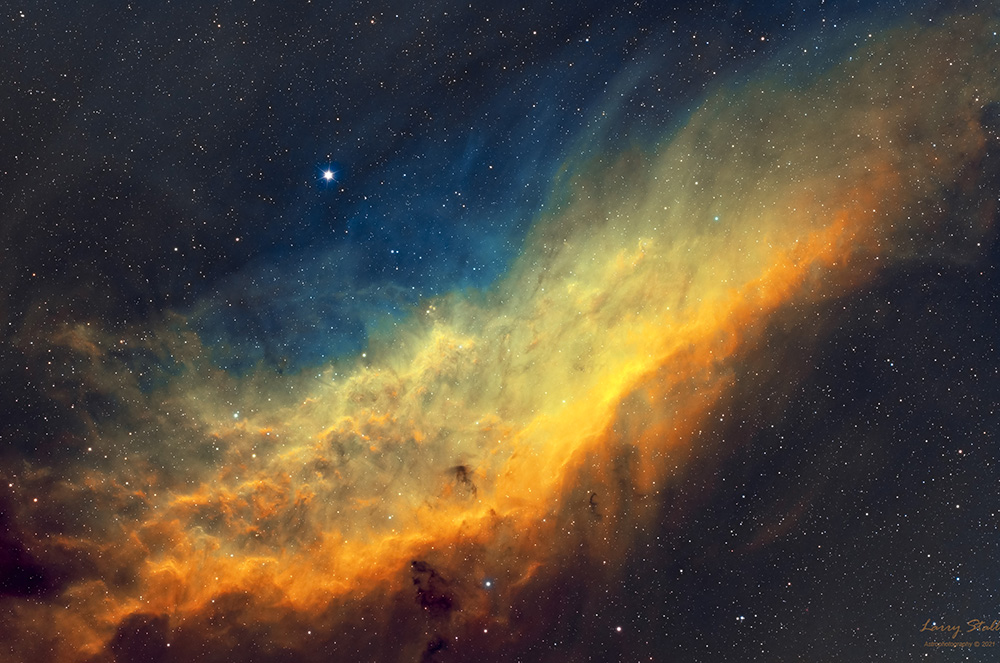
Larry Stall delivers spectacular color and composition in this month's photo of the California Nebula (NGC 1499). Here are the details.
The data for this image was collected from my Bortle 5 backyard, in Milton WI, over the nights of November 2-3. It was during the new moon phase.
Equipment
- Telescope - Takahashi FSQ-85EDX, 1.01x flattener, f/5.5
- Camera - ZWO ASI2600MM
- Filters - Astrodon 36mm RGB Series 2E, S-H-O at 5nm
- Mount - iOptron GEM45
- Guiding - ZWO ASI120MM Mini, Primaluce 60mm CompactGuide
- Pegasus Powerbox Adv, Beelink T34 Window 10 Pro Mini PC
Acquisition
- Astrodon 36mm B Series 2E: 30x90" (45') (gain: 0.00) -15C bin 1x1
- Astrodon 36mm G Series 2E: 30x90" (45') (gain: 0.00) -15C bin 1x1
- Astrodon 36mm Ha 5nm: 50x360" (5h) (gain: 100.00) -15C bin 1x1
- Astrodon 36mm OIII 5nm: 50x360" (5h) (gain: 100.00) -15C bin 1x1
- Astrodon 36mm R Series 2E: 30x90" (45') (gain: 0.00) -15C bin 1x1
- Astrodon 36mm SII 5nm: 50x360" (5h) (gain: 100.00) -15C bin 1x1
- Total integration = 17h 15'
- Control software - SGP Pro
Calibration, stacking, and processing done with Pixinsight, final adjustments in Photoshop CC
I started out doing visual observing with an SCT and Alt-Az mount. After retiring from engineering machine control systems, 4 years ago, I started pursuing astrophotography. I find it a challenging and rewarding hobby. It is a field that provides endless possibilities limited only by one's budget and imagination. I'm still learning and gradually improving.
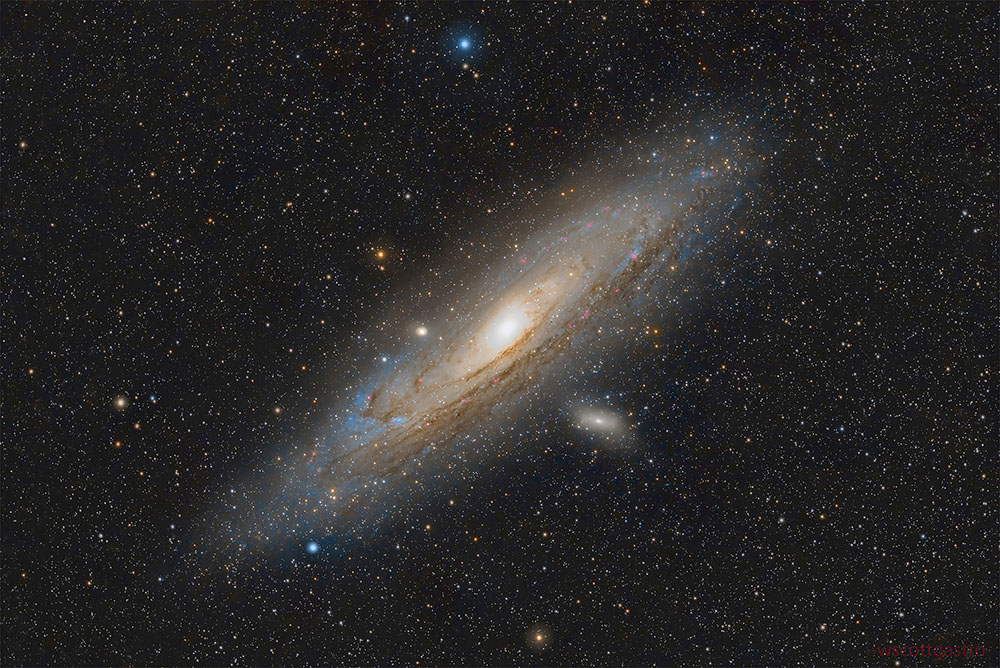
This months photo captures the Andromeda Galaxy in beautiful detail. Scott Garrod captured this in a backyard near Parksville, BC.
- This photo was taken from my Bortle 4 backyard in the Parksville area, Vancouver Island.
- Telescope- William Optiics Z61, with WO Flat 61Reducer
- Camera- ZWO asi2600MC Pro
- Mount- iOptron CEM63
- Guide- ZWO 30mm mini scope with asi120mini camer
- Filter- Optolong L-Pr0
- AsiAir Pro
- 66 images x300 seconds for an total integration time of 5 hours and 30 minutes
This months photo comes from Corpus Christi, Texas. Here are the capture details for this amazing photo from David Adam Pyle.
I'm fairly new to Astrophotography, and it took me a good while to understand that more integration time meant better quality imaging. It was so easy to want to catch as many objects as I could in a night, but I was not producing the quality I wanted. This image was a result of me trying to slow down, and dedicating multiple nights to a target. I ended up with 9.5 hrs of integration of Ha (180" subs), and 7.5 hours of integration between SII and OIII (180" subs) using my QHY163M and Baader Narrowband Filters in a Bortle 5 location of Corpus Christi, TX. I had recently received an Explore Scientific 8in CF Astrograph f/3.9 before this target, and it really made my images take off compared to my old Orion 8" f/4.9. This OTA was guided with a Skywatcher EQ6-R Pro mount and a QHY5III290 guide camera in a QHY Mini Guide Scope. An ES HRCC was utilized to reduce the coma from this quick scope, and everything was imaged using NINA, stacked with DSS, and processed with Pixinsight. This was also one of the first times I had tried to do star reduction, as well as integrating Topaz Sharpen and Denoise into my workflow.
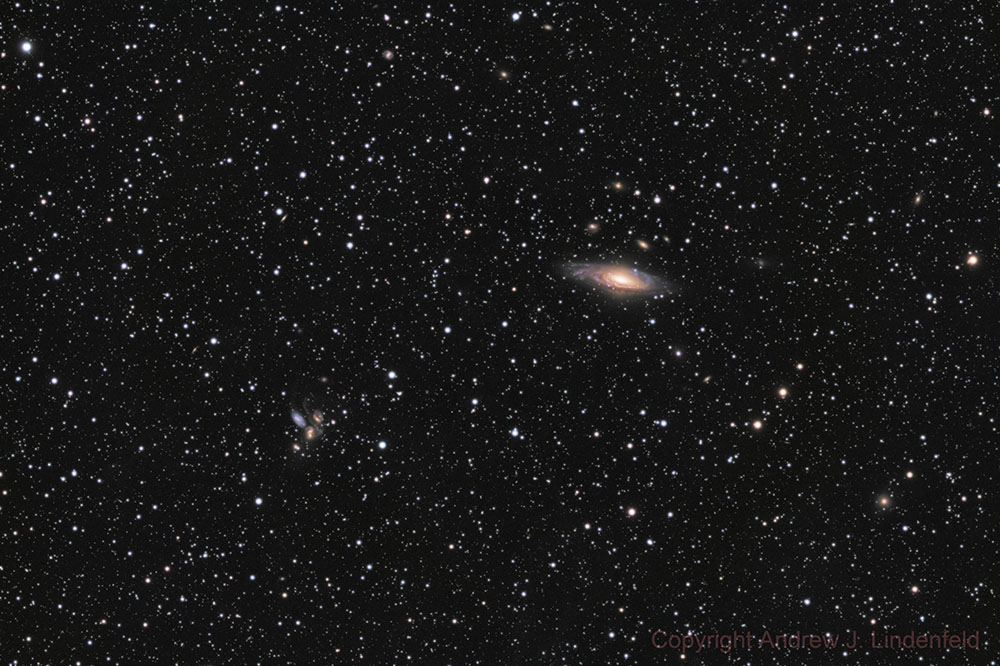
This months photo comes from Salem, New York. Here are the details from Andrew, including a good reminder for all of us to back up our data regularly!
Here's the story behind the image. As far as the data acquisition, things were pretty straightforward. I was contacted by my friend who owns the dark site with good news. The sky was forecast to be clear and smoke free, and the moon was setting around 11pm, so we needed to get up there and take advantage. It was one of those nights where everything just worked perfectly. I got setup and started gathering subs. Started with RGB, because those are the most important to snag under dark skies. I ended up finishing that sequence with 2 hours of darkness left, so I was even able to gather some luminance data as well. It just couldn't have gone any better. It was a beautiful night. The next day I processed the image in Astro Pixel Processor. It was such nice data to work with, and it didn't take long to get the result you see. I uploaded the image to astrobin, and less than an hour later, my hard drive crashed! I wasn't able to back up the data beforehand, so all the data is lost except the full res jpeg. Knowing others appreciate this image makes losing the data less painful though!
Clear skies!
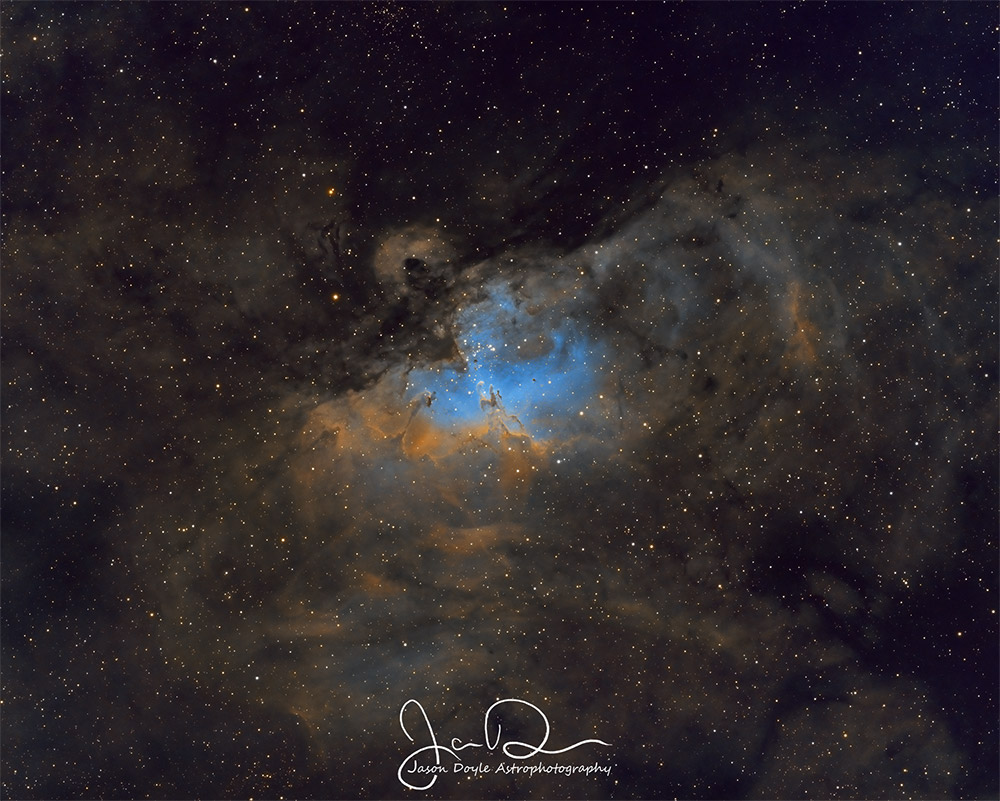
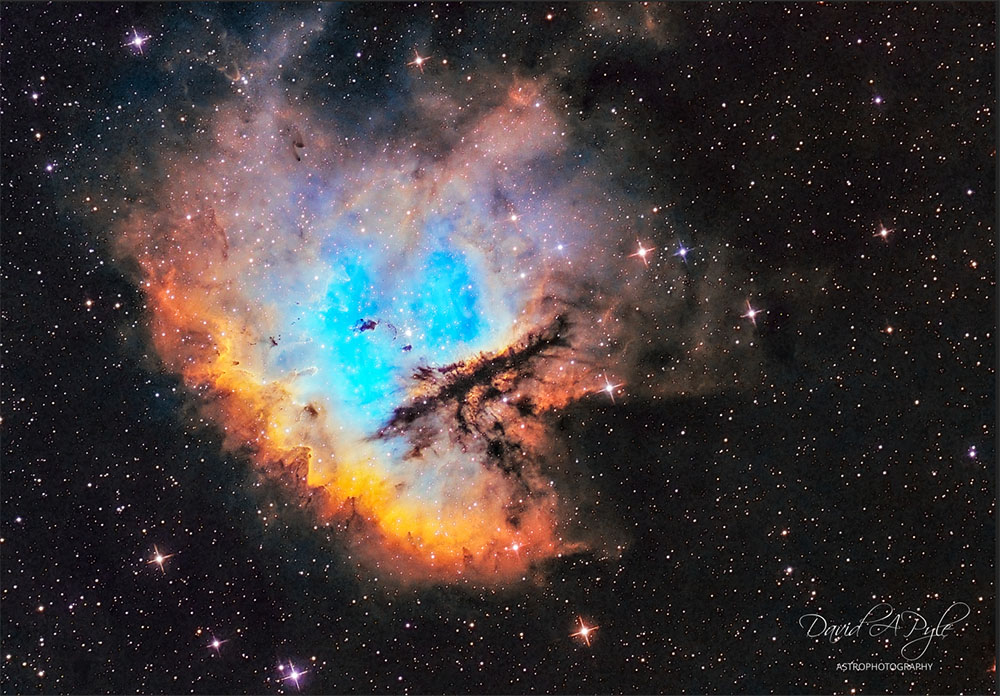
This months photo comes from the East Coast and captures an incredible summertime favorite for many. Here are the details from Jason.
I was amazed when first seeing Hubble's "Pillars of Creation" image back in 1995, so when I began astrophotography 3 years ago this target was definitely on my list. It wasn't until this summer that I had the chance to image the Eagle Nebula, and I was equally amazed that I was able to capture my own version of this iconic region of space from my backyard just outside Baltimore, MD.
Equipment:
- Scope: SkyWatcher Esprit 100ED
- Camera: ZWO ASI1600mm
- Filters: Chroma 3nm
- Mount: Skywatcher EQ6-R Pro
Total integration was just over 4 hours
- Ha: 31x180" (1h 33') (gain: 200.00)
- OIII: 17x180" (51') (gain: 200.00)
- SII: 20x300" (1h 40') (gain: 200.00)
- Darks, Flats, and Dark flats were used
Acquisition was done with NINA, and the raw images were stacked in AstroPixelProcessor. The resulting images were processed with Photoshop CC in the "Hubble Palette", where Sulfur is assigned to the red channel, Hydrogen to green, and Oxygen to blue.
Clear skies everyone :)
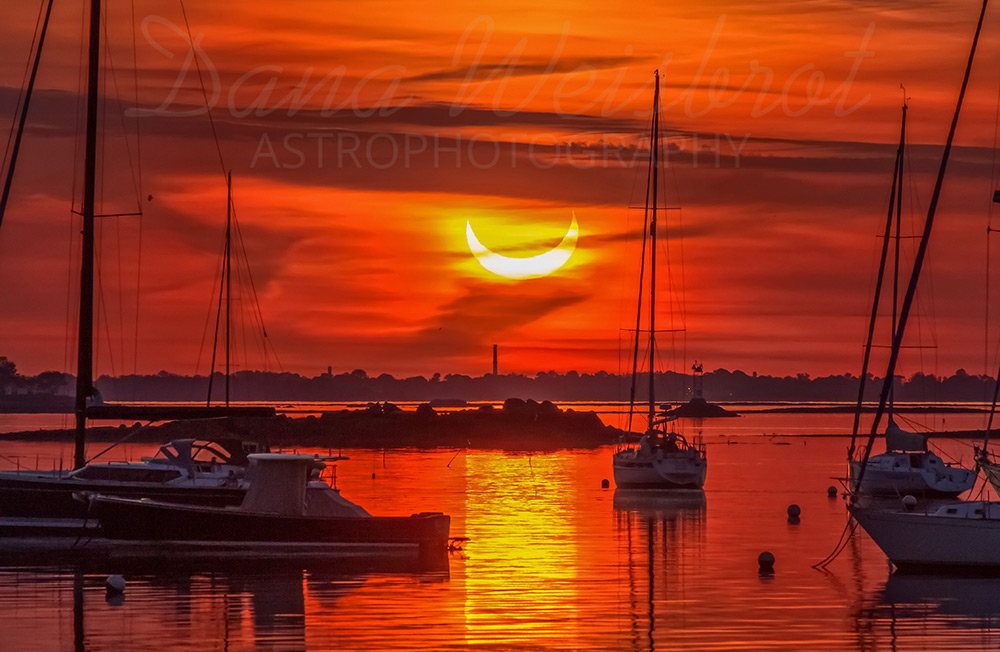
In June, the East Coast of the US and Canada (as well as the Northern Territories and Northern Alaska) were treated to an Annular Solar Eclipse. June's photo comes from Rowayton, Connecticut. Dana Weisbrot captured the Devil's horns in extrodinary detail as the sun rose. Here are the details from Dana.
I shot this photo at 5:28 am, June 10th, from a private beach on Bell Island in Rowayton, Connecticut. Since the Sun would be very low to the horizon at maximum eclipse I had originally planned on shooting from the top floor of a parking garage situated high on a hill, however, a few days before the tenth, I remembered the beach that I had previously shot Comet Neowise, and thought it may be better. I drove down to the beach with my trusty compass to check if the Sun would be rising in the right location. It seemed like it should work, but I wasn't positive. The morning of the tenth I left my house at 4:55 am, and started to drive to the beach, but I wasn't sure I was making the right choice. When I got there, I could see where the pre sunrise glow was coming from and it looked to be good. I set up my tripod on the beach and took a rough guess of the exposure settings. When I realized the Sun was breaking above the horizon I started taking a lot of shots at varying exposures. I was very nervous that I would blow my opportunity since the Sun was rising quickly. As the Sun was rising I had to keep moving the tripod to the left to keep the Sun positioned between the boats and had to constantly adjust the exposure settings since the Sun was getting brighter. There were a lot of clouds around and I wasn't sure how my photos were coming out, but in the end I got several nice shots.
- Single image from Canon T3i
- Kit 55-250mm lens at 250mm
- ISO 100 at F13, 1/40th second shot.
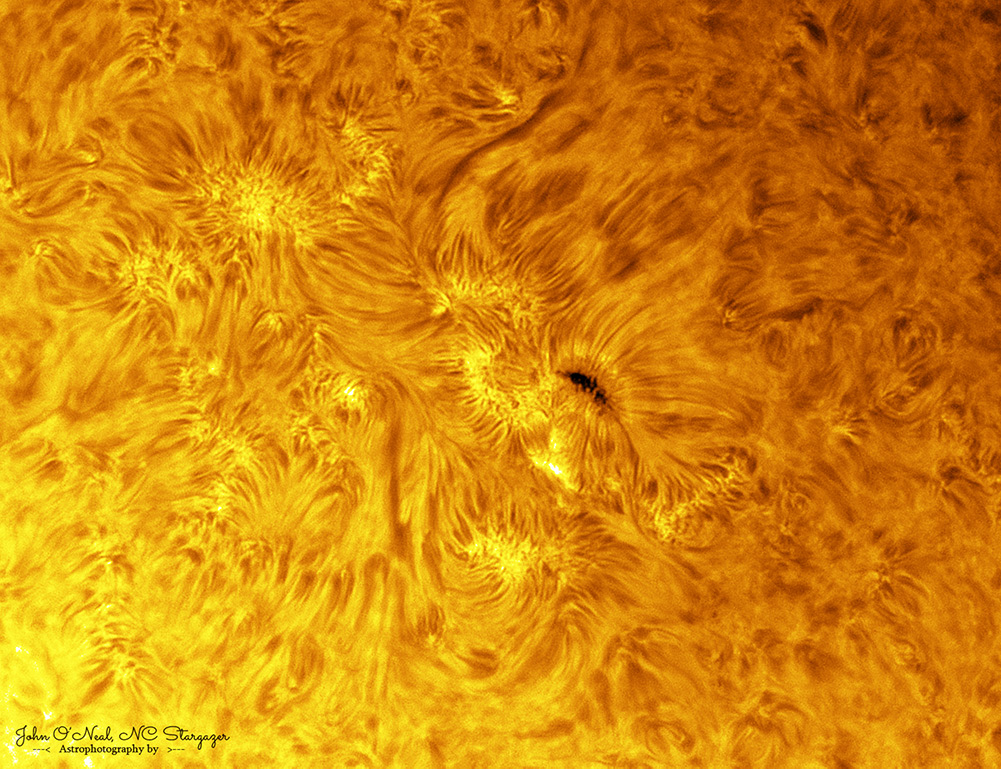
Sunspots incoming! We've entered the 25th solar cycle, which is predicted to be stronger than the 24th and peak around 2025. May's shot comes from Statesville, NC, and captures AR 2822 in glorious detail! Here are the details from John.
Shot May 14th at 09:44am local time using my homemade BIG RED Solar Telescope, a five inch f/9.5 and a Hydrogen Alpha QUARK Chromosphere by DAYSTAR Filters at prime focus. The camera was a ZWO ASI174mm.
I shot 3,000 serial frames in 30 seconds using the Sharpcap app. I stacked 12% of the very best images, then sharpened the result in Registax. I colorized and made final adjustments in Adobe Photoshop CS6.
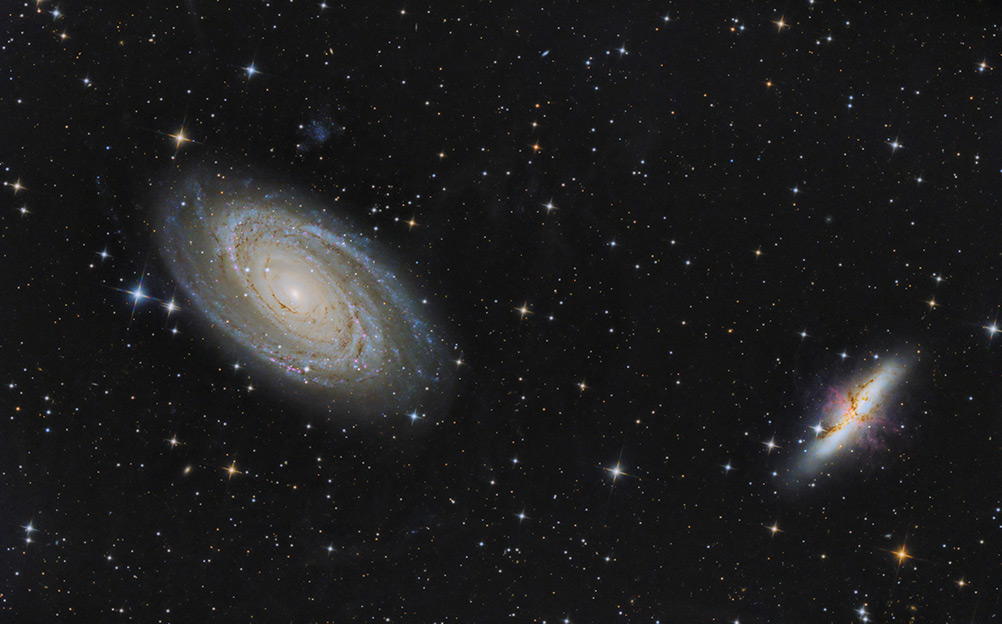
Galaxy season continues with this incredible capture of M81 & M82 from Akron, Ohio. Colin captured about 30 hours of data between February and March over 6 nights in the backyard.
The image was taken with:
- Skywatcher 12" f/4 Newtonian
- Skywatcher coma corrector
- ZWO Off axis guider
- ZWO ASI178mm guide camera
- ASI2600MC imaging camera
- EQ8-R Pro mount
The data was originally processed in Siril and GIMP but was reprocessed with the recent purchase of PixInsight.
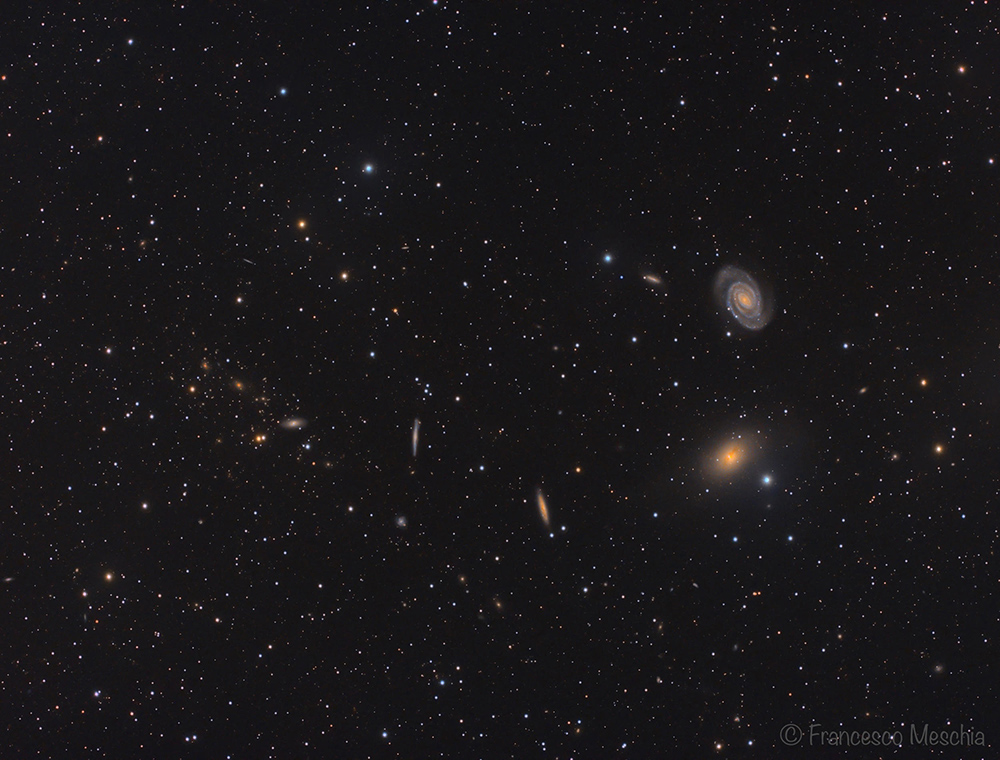
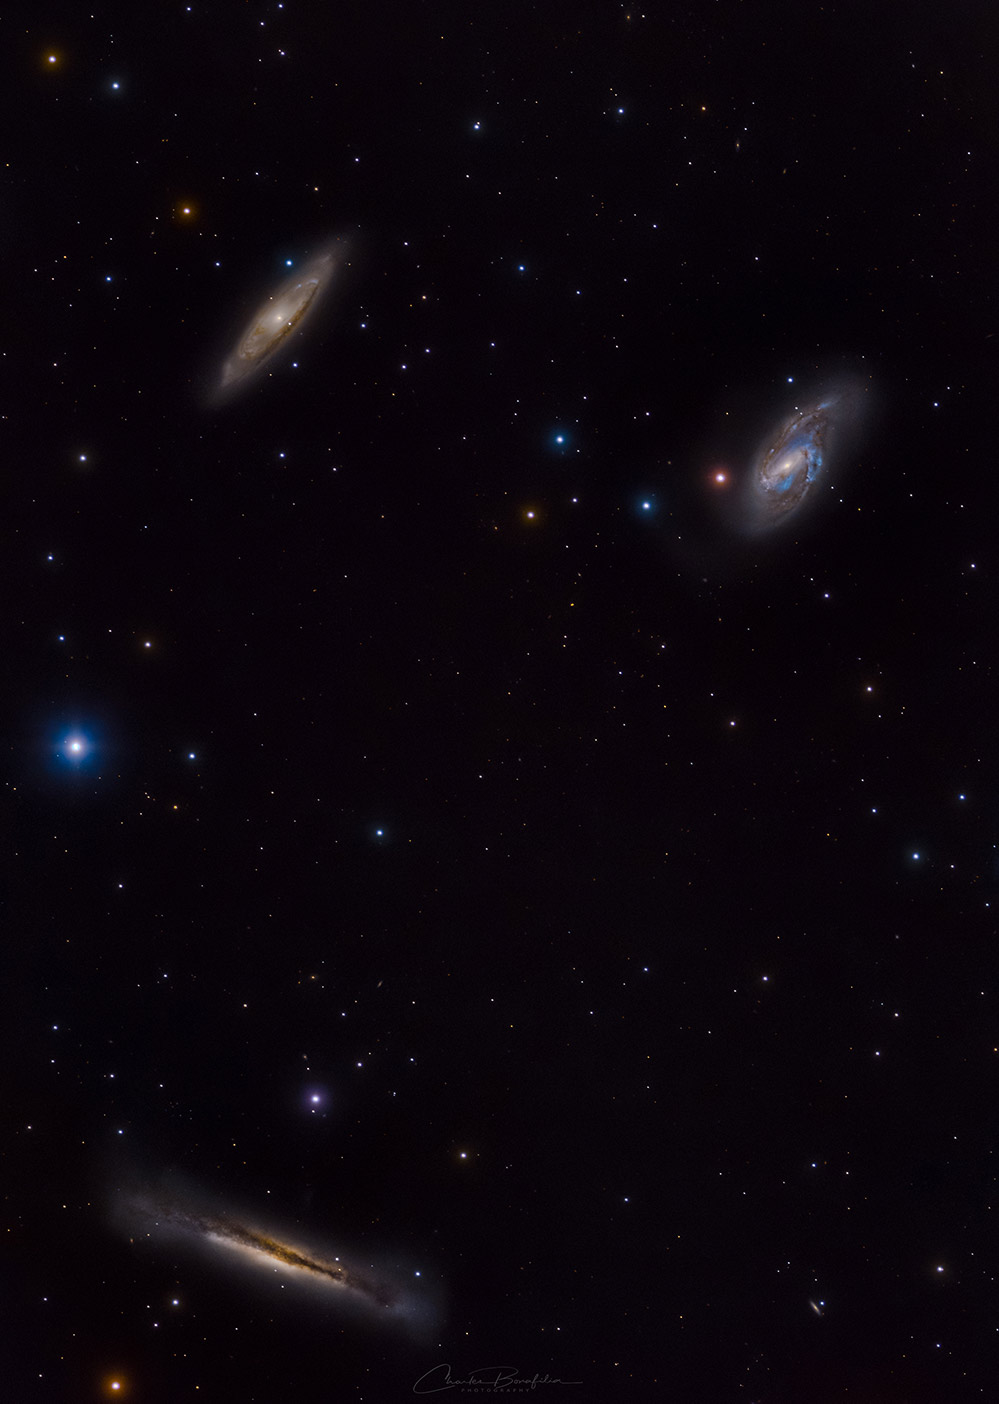
This months APOM comes from the dark skies at Pinnacles National Park in San Benito County, California.
NGC 5364 is a "grand design" spiral galaxy found in the Eastern part of the constellation Virgo, over 50 million light years away from us. In this image it is accompanied by a few other elliptical and spiral galaxies located between 40 and 70 million light years away, but also by the galaxy cluster Abell 1809, that sits at over 1.1 billion light years of distance. Abell 1809 is visible in the left portion of the image, about halfway from the top, and looks like a cluster of faint, yellow stars... until one zooms in to full resolution and sees that the "stars" are actually small fuzzy galaxies, almost 20 times farther than the foreground galaxies.
Equipment:
- Astro-Tech AT130EDT
- Nikon D5500a
- Lacerta MGEN 2
- Lacerta MFOC
- iOptron iEQ45 Pro
Acquisition and processing:
- 30 x 480s light frames (4 hours of total integration)
- 25 darks
- 20 flats
- 300 bias
- Bortle 3 location (Pinnacles National Park, CA), sky radiance 21.65 mag/arcsec2
- Acquisition orchestrated with N.I.N.A.
- Processing in PixInsight
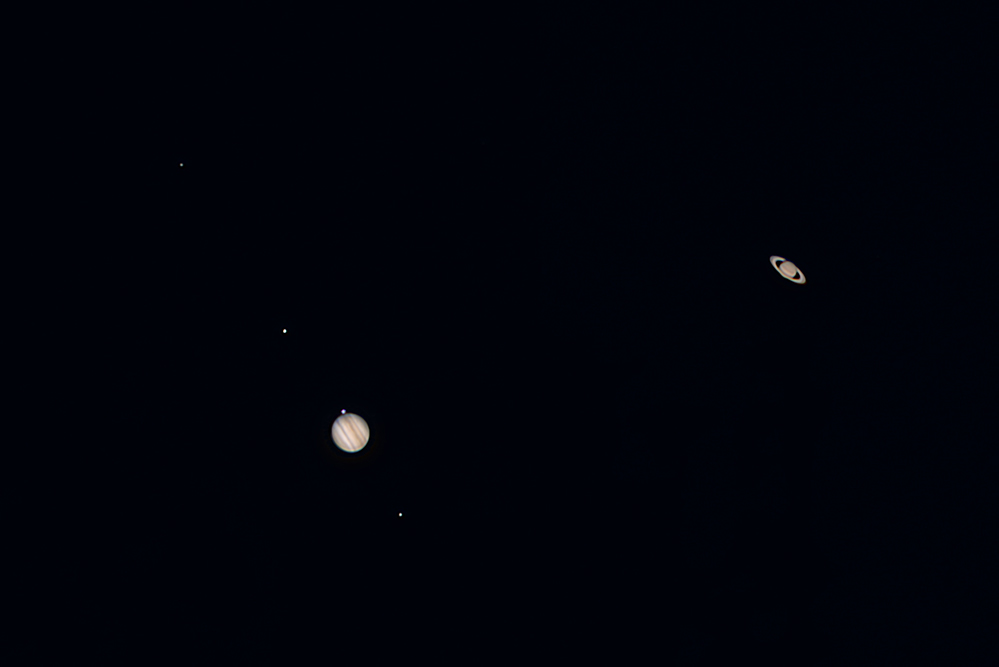
This month's APOM comes to us from Houston, Texas and captures the conjunction in great detail. Here are the photos details from Steve.
This HDR image of Saturn (magnitude +0.6) passing 0.1° west-northwest of Jupiter (magnitude -2.0) was taken from my backyard in Houston, Texas about 32 minutes after sunset (17:59 CST) on 21 December 2020. Last time the two planets were this close in angular separation was on 17 July 1623, and next time will be on Ides of March 2080.
Imaging was obtained using a Nikon Z7 camera directly coupled to a Celestron 9.25" f/10 Schmidt-Cassegrain telescope and tracked with a Celestron AVX mount. A total of 5 x 1 min videos with varying ISO (64, 100, 200, 400, and 800) were acquired using the camera's movie mode, 4K UHD 2160p at 30 fps. An image was created from each of the videos with different ISO by cropping and stacking the best 25% quality frames using PIPP and AutoStakkert. Details of the planets like Jupiter's cloud bands and Saturn's rings were then accentuated using wavelet transform in RegiStax. Details were best seen using ISO 64 for Jupiter, ISO 200 for Saturn, and ISO 400 and 800 for Jupiter's moons. Final HDR image was created using Photoshop by combining each of the images acquired with different ISO as layers and masking out over-exposed structures.
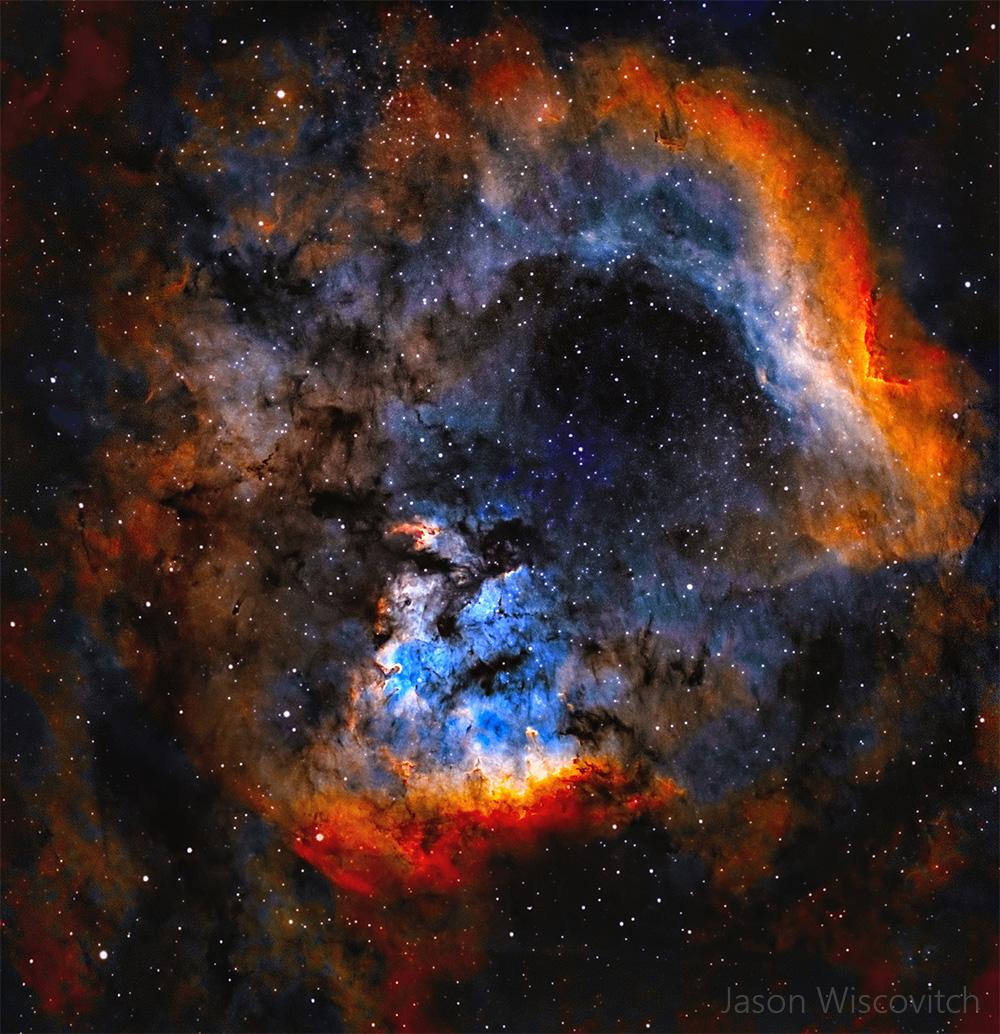
This month's APOM comes to us from Salt Lake City, Utah. NGC 7822, located in Cepheus, is a new star forming complex some 3000 light years from Earth.
Equipment
- @williamoptics RedCat 51
- @celestronuniverse Edge HD 8” with Hyperstar
- @zwoasi 1600mm x2, 224MC, 30mm Guide Scope, ASIAIR, ASIAIR PRO, & EAF
- @baaderplanetarium F2 HA, OIII, & SII, Astronomik HA, OIII, & SII Filters
- @skywatcherusa EQ6-R Mount
- SII - 275x90” (6.87hrs) Hyperstar & 108x180” (5.4hrs) RedCat 10/26 - 12.27hrs total
- HA - 380x90” (9.5hrs) Hyperstar & 165x180” (8.25hrs) RedCat 9/29 - 17.75hrs total
- OIII - 300x90” (7.5hrs) Hyperstar & 116x180” (5.8hrs) Redcat 10/19 - 13.3hrs total
- 43.32 Total Integration Time
- 50 Darks, 50 Flats, 250 Bias per session
- Gain 139
- Temp-15c
- Bortle 5
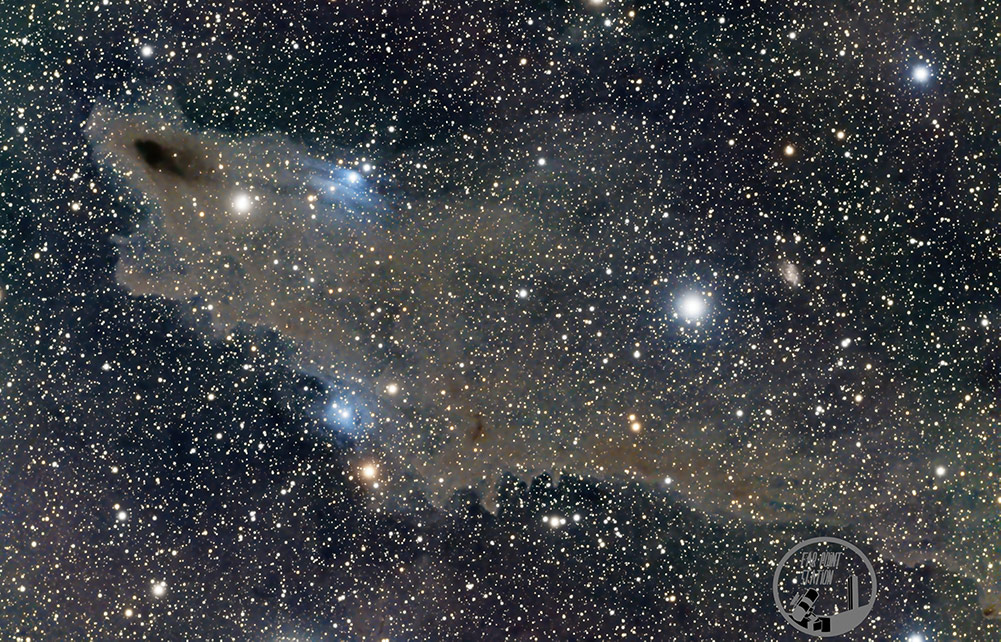
This month's APOM comes to us from Aneroid, Canada. The Dark Shark Nebula (LDN 1235) can be found swimming in the constellation Cepheus. The large molecular cloud blots out the stars behind and contains two blue reflection nebulae, vdB149 and vdB150. Below are the acquisition details from Stan Noble.
I used a SkyWatcher 80ED telescope with ZWO 294 MC Pro & Starfield 1 x's field flattener, Altair Astro 66 LightWave & GPCAM 327C for guide scope & camera, with PHD2 & NINA for capture. Over 2 nights I gathered 324- 120 second light frames & stacked & calibrated in Astro Pixel Processor with 30 Dark,Flat & Flat Darks frames. I processed in PixInsight & Topaz Adjust.
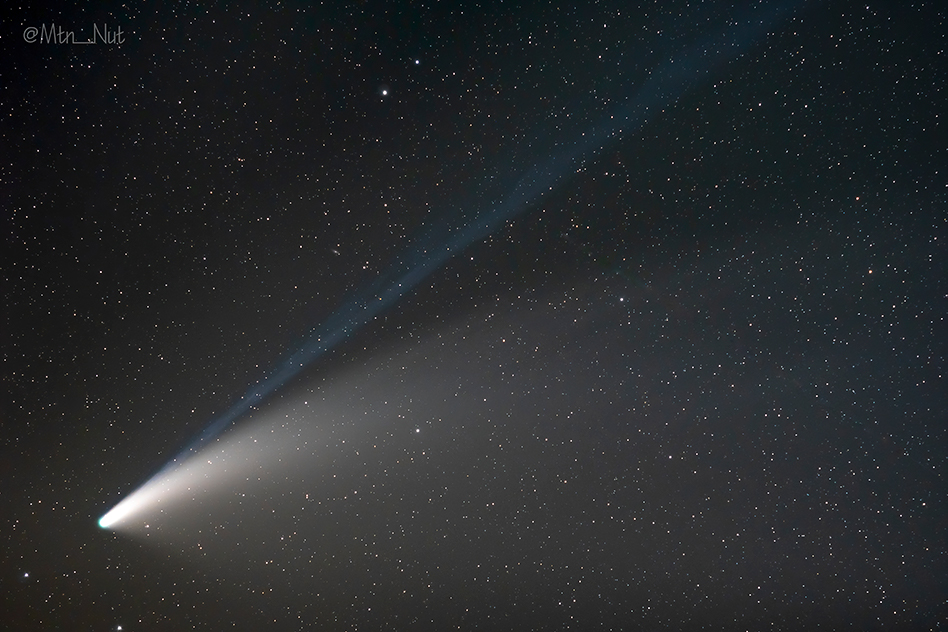
This photo of comet NEOWISE was taken at the Thomas Lakes Trailhead / Mount Sopris Trailhead near Carbondale, CO. This is a Bortle class two location, but the comet's location in the sky was directly over Carbondale, so there was some light pollution below the comet (left side of the frame). The light pollution was removed partially with a filter and partially with Lightroom to give the sky a more consistent color.
The photo was taken with a Sony A6100 with a Rokinon 135mm F/2 lens stopped down to F/2.4 to give the stars a little more sharpness. The Rokinon lens has an astrokraken bracket system to make it easier to use, and I used a sharpstar2 bahtinov filter to get my focus perfect. Lastly, I have a 77mm Hoya RA54 filter to help cut down on some of the light pollution. I used a Vixen Polarie tracking mount that was manually aligned to Polaris, using a laser pointer and the polarfinder android app to make it a little easier to align. After taking a few higher ISO short exposure test photos to line up the comet in the frame, I started taking longer exposure at a lower ISO. This was a single 2-minute exposure at ISO 800. It was processed in Lightroom and then exported as a TIFF to Denoise AI for a quick final sharpening and noise reduction before being rendered as a final JPG. There is nothing added to the photo, but there was a little bit of healing brush used to remove a satellite trail. This photo is not cropped, and no color was added that was not part of the white balance adjustment. I like my photos to be as realistic as possible, so I normally avoid photoshop or composite photos.
This is a composite image consisting of 12 Moon photos stacked in Deep sky stacker then sharpened with wavelets in Registax 6 to get some nice surface detail. I then added the 9 photos that included the ISS as layers in Gimp, to blend the images together and to also adjust the saturation and contrast.
It took me about 2 hours to process this photo that only took a total of 1.25 seconds to shoot, but it was well worth the effort. I really enjoy shooting the ISS and have several other transit photos and videos posted on my Facebook page.
I use transit-finder.com to plan all my transit shots. Just enter your location and the dates and that's all you need to know. Pro tip: You want to be as close to the centerline as possible for the longest transit time. Also, looking for transits with the Moon or Sun at a higher altitude is desirable because the ISS will be closer.
- Luminance - 90 @ 240s (90 photos, each with an exposure time of 240 seconds)
- Red - 35 @ 220s
- Green - 35 @ 220s
- Blue - 50 @ 220s
- Processed in PI/PS
- Hydrogen-Alpha : 300s x 47 (47 images, each being 300 seconds in exposure)
- Sulfur-II : 300s x 27
- Oxygen III : 200s x 79